Today's tutorial covers image management on your computer. Proper image management begins with setting up an organized system, and includes having a clear, hierarchical folder system. This system has to extend from when you first transfer images to your hard drive, to managing your edited images. It is also important to be aware of proper backup storage techniques.
One of the best aspects of digital file storage is the ability to apply tags to your images with software such as Adobe Bridge, then finding your files based on key words or ratings that you've given them.
Image management is very important, and becomes even more so with every picture you shoot. Without proper management, your images could be lost or destroyed, and tracking existing images could be a cumbersome, onerous task. The good news is that image management can be easy and efficient, but you have to have a solid system in place first.
Why can't you just throw all your images into one folder, or even, say, just all your edited images? Well, if you're bored some afternoon, put 500+ images in one folder. Give your computer a minute to catalogue them all. Then reboot your computer and open the folder again. Your computer won't hold a cache for all those images, so it has to recatologue them. Imagine now that there are 20,000 images in there. How would you ever find what you wanted? How could you take the time for the computer to load the folder in the first place? Being organized isn't such a pain - set up a good system once and it will pay off forever!
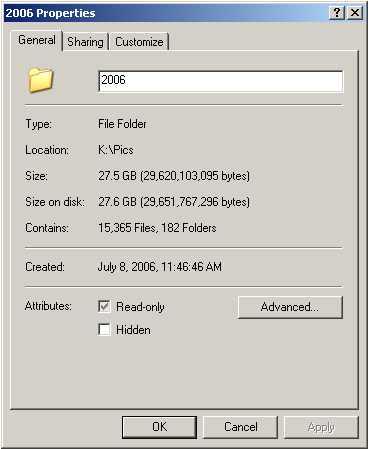
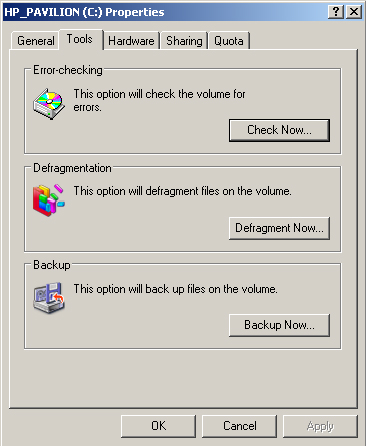
The above image shows the properties of the folder containing all of my images - originals and edits. This is about 11 months worth of shooting, and though I may shoot a fair bit for an amateur, you get an idea of how this sort of thing can get out of hand. Close to 30GB, and more than 15,000 images. It's important to stay organized!
Setting up an Organized System
It is important to have a good system in place. Of course, it is easiest to start this from the beginning, but by the time you realize you need a better system, you probably already have a problem with your current one.
This is the method I use, and that I have found several other people use. It's efficient, pragmatic, and clear:
If you have the money, buy a second hard drive for your computer - one that is only for your photographs - no other files, no programs - just your photographs.
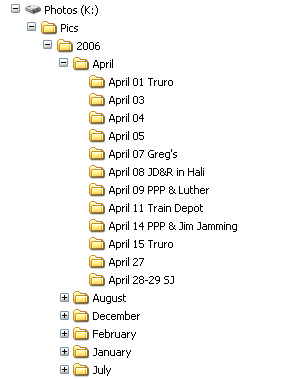
Create one folder each for every year of photographs you have - this will be your primary filing level.
In each 'year folder', create one folder each for every month - this will be your secondary filing level.
In each 'month folder', you will have one folder for every day of shooting you have done - this will be your tertiary (and final) filing level. I prefer to create mine as I shoot, as I do not create images every day, and I do not need excess, empty folders.
Be careful having too many subdirectories. You will want a simple, clean system. Also, as I will mention again, some burning programs only accept a maximum number of characters - going over will result in a truncated (and thus unclear) file name. This is a balance of clarity and brevity!
Naming Image Folders
As important as organizing your images is, you must be able to find your images later on. Be clear in your folder naming:
When creating folders for a given day, put the month and day in the title (ex: April 17).
For single-digit dates, be sure to put a zero (0) in front of the date number (ex: February 02), so that when the folders are sorted alphabetically, the 2s will not be in with the 20s, nor the threes in with the 30s, and so on.
It is a good idea to put a specific name with that folder as well to help remind you of its contents. Try to think of something specific, memorable, and brief. Then add it to the end of the folder name (ex: February 02 - Molly Portraits). It is often easier to remember an event than a particular date.
Try not to create folder names that are too long. Some burning programs only allow a certain number of characters, and you do not want to lose the end of a file name.
Transferring and Backing Up Images
Now that you have a good system set up for your images, it's time to organize the images themselves. Let's start from the beginning, when images are first transferred from your camera or digital memory to your computer.
Create a folder for the specific day the images were created (if there are several days of images on the folder, split them up into their respective days) as per the instructions above. Then put the folders of images in the corresponding 'month folders'.
Now that the images are on your hard drive, it's a very good idea to back them up to at least one other location before you empty your memory card. As mentioned above, I have an extra hard drive just for my photographs. For now, I use my C: drive (master hard drive) for backup. A better (though more expensive) system would be to have another dedicated hard drive (possible external) for backup.
If you don't have a second hard drive for backup, it's a good idea to back up the images on CD or DVD. Blank discs from reputable companies are so inexpensive these days (~$0.30 Canadian). The best thing to do is to make two (2) copies, keep one 'on site' (where your computer is), and bring the other somewhere out of the building - maybe to work, or to a friend's place whom you trust.
Now you're ready to erase (format) your camera's memory card. I prefer to do it in-camera for two reasons: first, this makes sure the camera formats the card with a system that the camera's software will understand; secondly, it ensures that you don't accidentally erase or format the wrong folder or drive on your computer - stranger things have happened!
Managing Edited Images
There is quite a bit you can do to keep your images organized in the editing process. I will cover Image Tags in the next section, just below.
First, when you have edited your photo and go to save it (no matter what file format you choose), I find it best to keep the original file name and file location, but add another name to the end.
If creating alternate versions, show that in the name somehow.Ex: DSC_1035 - Water Drops.jpg, or DSC_2846 - Edit.psd, etc.
Ex: DSC_1035 - Water Drops.jpg and DSC_1035 - Water Drops B&W.jpg, DSC_1035 - Water Drops crop.jpg, DSC_1035 - Water Drops Resize 20x30.jpg, etc.
By keeping the original names and locations with the edited images, it is easier to find the originals for future editing. Also, if you remember the date or name of the event you shot, it will be easy to find all the associated images.
When finished editing a group of images, back them up!
How often you do this is up to you (depends on value - either personal or monetary). I do it once I have a full month shot and edited, but I always keep a backup on a second hard drive, and I am 'only' an amateur. If this was my living, I'd backup everything every day.
Back up onto secondary hard drive (remember, only the originals are backed up on there now!)
Back up onto DVD and bring them off site. When I back up my edits, I back them up with the originals again. It makes one more copy, and if my hard drive were to fail, it would be a quick and easy way to restore everything.
Another option to the endless DVDs is a portable hard drive. They are getting cheaper all the time, and it would be a quick, easy way to back up your photos and bring them to a secure, off site location.
I can't stress this enough - backing up is cheap! You can get reputable, 250GB, 7200 RPD, SATA hard drives for under $100 Canadian (forget the $200+ futureshop drives - check your local stores!), and DVDs and CDs can be found 100 for $30. Compare this to the film days when a roll of 24 was $5 for the film, and up to $20 for the developing and processing. You can put hundreds of thousands on a hard drive, or well over a thousand on a DVD!
Image Tags with Adobe Bridge
So, you have a beautiful file system set up. And you're always careful to name your folders and images in a way so that you'll know what they are and where they are. But what if you want to quickly find all of your images of 'Aunt Jane', or all your .psd files, or your macros, or.... Fortunately, there are programs out there that do this 'tagging' for you. One such program (and it comes with Photoshop CS2) is Adobe Bridge.
Not only is Bridge great for going through your folders and images (even previewing large-size RAW images if you have Adobe Camera Raw (ACR) installed), but you can add custom image tags, ratings, and labels to your images.
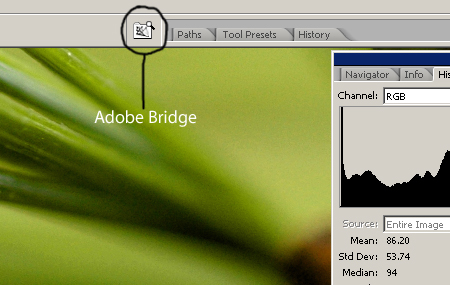
To do this, first open Adobe Bridge, either directly, or by clicking the Bridge Icon in Photoshop, just below the Menu Bar:
Once in Bridge, open the Keywords tab, or click View > Keywords Panel. Once there, you can create your own keyword groups, and keywords themselves.
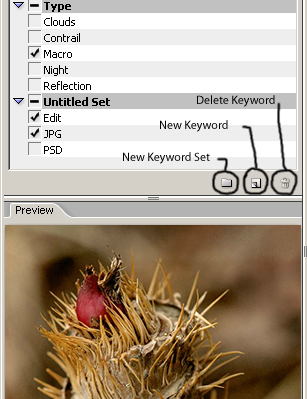
To create a new group of tags, click the New Keyword Set icon, and to create a new keyword itself, click the New Keyword, both in the bottom of the Keyword window of Bridge.
I like to have tags for 'Edited', 'JPG', and 'PSD' (when I keep layered versions of my photographs), so I can always find specific files.
Note: I do not tag any of my unedited photos, but that is just my personal preference.
I also have specific tags for common photographs - specific people, scenes, or types (macro, clouds, reflections, B&W, etc.) of photographs that I do. It makes finding those images later on that much easier.
Now, to tag the images, simply select the images you want tagged in Bridge (use Ctrl + Left-Click to select multiple images), then simply click on the check box next to each tag in the Keywords Window.
Note: Images open in Photoshop can not be tagged!
There are two more options for 'tagging' images.
The first is to give them a rating. You can do this by selecting an image (or several images) in Bridge, then, putting the mouse just under the thumbnail of the image, select the number of stars you wish to give that image. Presumably this would be simply a ranking system - more stars meaning you like the image more, fewer stars meaning you like the image less. It is quick and simple, though I do prefer the keyword system myself. Of course, a combination of systems can be used.

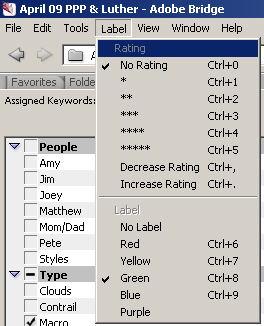
The second alternative is what Bridge calls 'Labels', where you associate a colour with an image - assuming you will keep track of what colour means what. This option is access by selecting the desired image(s), then clicking Label > then selecting the label (colour) of your choice.
It's relatively quick and easy to tag your images, and when you want to find an image out of thousands, it's really worth the extra effort.
Searching Tagged Images with Adobe Bridge
Now that you have your images tagged, searching for them is relatively easy.
Go into Bridge, and click Edit > Find (Ctrl + F). This window will appear:
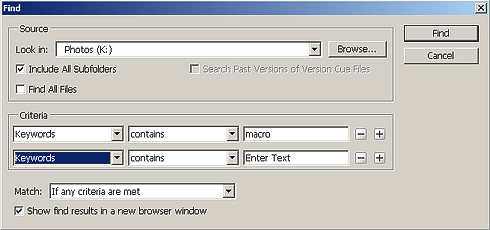
If you know what folder your images are in, choose it from the drop-down menu. Otherwise, choose an entire drive for a broad search.
I prefer to have 'Include Subfolders' selected, as this will look in the chosen folder and any within it.
Selecting 'Find All Files' will return all files - not what you are normally looking for.
In the next drop-down menu, make sure you select 'Keywords' from the list, if it is in fact Keywords that you are looking for. If you have an image named 'DSC-1111 - flower' and tagged as 'Macro', but only search for file name 'Macro', it will not find that image. However, you can search for filenames here (or by any of the search criteria), if you know them.
The next drop-down menu determines how specific you want the search to be - whether it simply 'contains' your search string, begins or ends with it, or exactly 'is' your search string.
In the last box of that row, enter what you want to look for.
Note: You can use multiple search criteria - simply click the plus (+) sign at the end of the search string.
You can then decide if you want the search to Match 'If Any Criteria are Met', or 'If All Criteria are Met'. This will decide if your search brings back images with 'any' of your keywords, or 'all' of them.
I prefer to 'Show Search Results in a New Browser Window', as I am sometimes working on something in the current window.
Finally, click OK and Bridge will begin searching through your files!
DVD Storage
When blank CDs came out, they were almost $2 a piece - still a great deal for what you could store on them. Then DVDs came out, about the same price - an even better deal! Then the prices dropped - there is no reason not to back up your images onto DVD if you have access to a burner. Buy one, borrow one, do something!
Once you have your images copied to CD or DVD, there are a couple more things you can do to secure the safety of your images.
First - and this may be over the top for lighter users - some people back up all their image twice, then on two different brands of DVD. That's four copies! They keep one copy of each brand where their base is, and keep another set somewhere secure (another building, safety deposit box, etc.). Then, once a year, check the files on each brand on DVD. If one brand looks be going corrupt, they have another safe set. Then they back up and replace all the DVDs of the 'corrupting' brand. If your pictures make you money, or mean the world to you, this is worth the effort.
Store DVDs in a cool place, away from direct light. If you have your 'home base' DVDs on your desk or a bookshelf, just make sure sun doesn't get to them. Maybe store them in a dresser drawer somewhere.
Keep DVDs in hard cases - not in spindles, and not in the soft cases or CD books.
Keep the DVDs upright. I don't know the reason for this or the last point, but apparently it makes a difference. Don't lie them down flat. Keep them vertical, like books on a shelf.
Try to use CDs and DVDs from reputable brands only. Just because some off-brand disc is on sale one week doesn't mean you should trust important files with it. Discs can go bad. Even good brand names can have a disc fail, but it's less likely. If you're not sure what's hot, and what's not, Google is always a good place to look.
One final note - Defrag your hard drive regularly. With so many large files moving around all the time, your hard drive can become disorganized and slow. The process is easy. Right click on your hard drive, and go to Properties. Then click on the Tools tab, then Defragment Now.... It may take a couple of hours, but do it regularly, and your system performance will be vastly improved!
We have covered a lot here, but being organized is a very important part of photography. You don't need to follow this all step-by-step, but hopefully you will find it to be a very useful guideline.
As always, please Email me will any comments, suggestions, or corrections you have.
Thanks. Matt
4 comments:
My advice is not to trust your photos (or any other important data) to CDs or DVDs as long-term backups.
In my experience- after seeing many CDs, DVDs, tapes, and floppies lose data- you want to keep your data on active backups.
This means if you do want to use CDs and DVDs, then you need to read all of your archived media once every year or two and copy it to new media (i.e. new CDs or DVDs). This "refreshes" the data onto new media so there is less chance of losing it.
Alternatively, have a simple mirrored filesystem set up on your PC and/or use a directory synchronisation program (I think even the standard briefcase program with XP would do this, or there is another XP "powertoys" program that does it). This protects you from hard disk failure.
Backups to CD/DVD can be used to recover data , but should be thought of as a last resort, a fallback to your your "actively protected" hard disk data.
To protect from site failure (i.e. house fire), keep two external hard disks. Regularly (say once a month) copy files to the one at home and move it offsite (friend's house or whatever), and at the same time retrieve the other external disk from there and bring it back home.
So, you've now covered yourself from media death (CD/DVD or hard disk), and site failure.
Thanks, I would find Adobe Bridge useful. I have been using Picassa and since Picassa doesn't get used for any purpose other than tagging, it is a pain. Your tutorials are detailed and I should put some of them to good use.
I prefer to create folders with location in the top of the hierarchy instead of date. I find it easy to search photos from one place. See more of my image management plan at paintedstork.com/digiblog/2005/12/digital-photography-and-image.html
Dear Matt,
thank you very much for sharing your techniques.
I am desperately trying to build my own digital workflow and your work may be of great help for me (and for many others, I suppose).
I suggest you also this link, I think it deserves to be read:
http://www.creativepro.com/story/feature/24542.html
Thanks again,
Stefano
p.s. by the way, very nice pics
A lot of useful and interesting information, thanks. I just wanted to add to your point on the folder structure. I, by pure coincidence, also use:
year -> month -> date-description
but then when I process, and depending on how I process, I add further folders. So all black and white conversions go in a folder called simply 'bw' for example. If I do a lot of heavy processing I tend to put those in a folder marked 'processed'. This way the source images, those that came from the camera and may have had only slight levels/curves adjustment, reside in the root of that date, with any post-processing results stored in extra folders.
Nice blog BTW, consider it bookmarked.
Post a Comment