Hello.
This is a Do-It-Yourself (DIY) guide to making some really good lighting tools. I cannot take credit for all of these, but hope this will be a useful resource.
There are several Flash Diffusers that are cheap (anywhere from free to a couple of dollars) to make, a homemade double-sided Reflector, and an excellent Light Box.
I'm all for finding new DIY items, so if you have something to share, please Email me. Let's get to it!
Flash Diffusers

There are three (four, if you include both film canisters) flash diffusers here. A yogurt container (for a slave flash), film canisters (for on-board flash), and a foam diffuser (for slave flash). Let's cover them in the same order as listed here.
Yogurt Container Diffusers

This diffuser is easy and inexpensive. It will really soften the light of your slave flash and is ideal for any macro shooting. First of all, it will move the actual light source forward (because light will radiate out from all parts of the container, and the end extends a few inches past the end of the flash head itself) so shooting objects close to the front of the lens will not have a shadow created by the lens. It also makes the light source very large (the full area of the yogurt container).
One thing to be cautious of a slight colour tint. Even with all the red on the yogurt container pictured, the colour balance only warmed up slightly. I usually prefer a slightly warm colour balance, but it's something to be aware of.
To make this diffuser:
Simply trace out the shape of the front of the flash head onto the lid of the yogurt container.
Cut out that shape with an exacto knife (do be careful - this may sound patronizing, but it always pays to be aware of the risks).
See if the lid fits a good inch or so down over the flash head. If not, make the necessary adjustments.
Put the yogurt lid onto the container itself (make sure its empty and clean - I hope that part's obvious), put the flash on the camera, and shoot as per normal. Assuming your camera has TTL flash, it'll make any necessary power adjustments.
This diffuser is handy, because if you know you're going some place where they have extra yogurt containers (I've always got a couple in my cupboards), you only need to bring the lid with you. Handy stuff!

Example of what the yogurt container diffuser can do.

Film Canister Diffusers

These diffusers are great for on-board flash. You can use any near-clear film canisters you have lying around (or most photo stores are happy to let you have some of their stash).
Film canister diffusers don't diffuse as much as the yogurt container diffuser does on slave flashes, but they do still increase the light source area, and make a slight improvement for close-up shooting to (help to eliminate the shadow caused by the lens).
As you can see in the two images above, you can make the diffuser to fit over the on-board flash width-wise or length-wise. It's more a matter of what will fit on your camera.
To make these diffusers:
To make the tall-and-narrow diffuser, discard the lid and cut notches out of both sides of the canister with an exacto knife. Make the notches wide enough to fit over the flash, but narrow enough to make it a snug fit so it won't fall off.
To make the short-and-wide diffuser, remove the lid and cut a hole in the side of the canister the same approximate shape as the on-board flash. Try the canister on the flash for fit and adjust as necessary. Replace the canister lid to keep the diffuser snug.

These diffusers are small and useful. They'll fit in your pocket and soften the harsh shadows caused by flash, making it great for close-up work and portraits.

Example of what the canister diffuser can do.

Foam Diffusers

This diffuser is easy to make and makes an incredible difference to the look of the light. It increases the size of the light source, thus diffusing it. But it also allows you to bounce some of the light from the flash off the ceiling, because the flash head has to be pointed vertically for the diffuser to work properly.
There are several references to this sort of thing on the internet already, found here, here, and here. I'm about to outline the one I found easiest to make, and that gave consistently great results.
The list of needed supplies is short and quite inexpensive:
1 sheet of white craft foam (found at Walmart for $0.99 Canadian).
1 sheet of black craft foam (same place).
8" (20cm) of high-quality velcro (don't cheap on this - the good stuff really pays off).
A knife or scissors.
A stapler (with staples, of course).
I had found a template for this diffuser on the internet months ago, but it seems to have been removed. So, I've created my own. You can print it off, just use it as a guide, or make your own design (if you come up with something really creative, I'd love to hear about it). So, here's the template:

Click on image above to see full-size version.

To create this diffuser:
Cut the same shape out of both the white and the black foam sheet.
Staple both pieces together so they fit perfectly over each other (staple around the edges - 1 staple per inch (2.5cm)).
Cut the velcro into 2 - 1" (2.5cm) pieces, and 1 - 2" (5cm) piece.
Attach the hook (non-fuzzy) part of the velcro to the white side of the diffuser, as shown in the diagram by the red rectangles. Then staple them on for extra reinforcement.
Crease the diffuser as shown in the diagram, folding in towards the white side.
There. Pretty simple, huh? Now comes for the flash part. Remember the pieces of velcro you cut out? Remember the loop (fuzzy) side of the velcro pieces you haven't used yet? Well, those get stuck onto the flash head itself. Put the diffuser over the flash head before you attach the velcro so you can see where to place it. The diffuser should tilt forward slightly when attached to the flash.
To use the diffuser, point the flash head straight up, attach the diffuser, and shoot as per normal. This will lower the maximum power of the flash slightly, but TTL cameras will compensate automatically. Shadows will be softer, harsh highlights will be reduced, and image quality will greatly improve. This diffuser is just great for portraits.
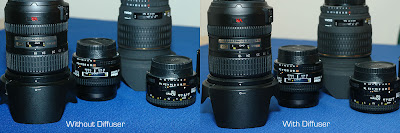
Example of what the foam diffuser can do. Note the decreased highlights and more even lighting.

Double-Sided Reflector
This next tool was suggested to me by Lisa-Marie Noseworthy at my local camera shop, Carsand Mosher. It's simple, easy to make, and really quite ingenious.

This reflector measures approximately 22x28" (55x70cm), and has gold and white squares on one side, and silver and white squares on the other. It is made from bristle board - one sheet of white woven into a sheet with gold on one side, and silver on the other. Double-sided sheets are common in craft and stationery stores.
Making this reflector is quite easy:
Measure and cut the white sheet into 2" (5cm) wide strips - cutting the strips along the shorter length.
With the gold/silver sheet, measure 2" (5cm) wide strips along the longer length, but when you cut the strips, leave approximately 2" (5cm) at one end uncut. This will help give the reflector strength.
Weave the white strips into the gold/silver sheet. If the first strip goes over-under-over-under..., make the next one go under-over-under-over... - keep alternating them.
To keep the strips together, tape or staple them all around the edges.

I find this reflector to be particularly useful when shooting portraits outside on a sunny day. If you have an assistant (fancy name for a friend, sometimes) you can get them to hold up the reflector and bounce light back into the shadow areas. You can use the silver side if you just want to reflect a lot of light, and use the gold side to warm (make slightly yellower) up the reflected light. The strips of white are there to reflect more light, and to keep the reflection from being too yellow.
Home Made Light Box
This next creation I can take absolutely no credit for (not that I can take much for any of the others). A gentleman named Bill Huber designed this, and did up all of the plans for it. Really incredible. I'll guide you to his website to see all the step-by-step instructions on how to build one of these:

Get the instructions on how to build the above light box Here.
I will make a couple of notes about this lightbox:
Use the compact fluorescent lightbulbs. Their low power consumption is only half the story - they don't get hot either! You can have them pressed up against the cotton, or close to the things you photograph in the box without fear of melting or fire.
If your camera has a manual white balance setting - use it! Even if you just get a reading off a clean, white sheet of paper. Accurate white balance is key!
A sturdy tripod is practically a must. Those lamps don't put out a whole lot of light, and you'll likely want to shoot at low ISO and with a small aperture to guarantee high quality. Using the timer (or better yet, Mirror Lock Up (MLU), if your camera has it) will be a big help, too. Be weary of even the slightest jiggles.
I didn't glue any of the joints of my light box together. That way I can easily disassemble it for storage or transportation, if needed. All the pieces fit together snugly on mine so far - if they loosen up, I'll try to figure out a solution for that.
And there you have it. Several handy, easy, inexpensive, DIY lighting tools. Hopefully these things will improve your photography and give you more reasons to get out (or stay in!) and shoot. If you get some good examples you'd like to share, feel free to Email me.
There's one more thing I must point out, and that is the website Strobist. This is the best website on lighting (including a lot of DIY projects) out there, in my opinion. Check it out regularly, because they have a lot to share, and update it frequently.
As always, if you have anything to add, suggest, correct, or just want to chat about, please Email me.
Thanks.
Matt