This is going to be a long post - we have a lot to cover. I posted a tutorial earlier this week on Adjustment Layers and then had some requests for a tutorial on how to add layer masks. Layer Masks are amazing tools and there are several ways to use and apply them.
In this tutorial we will cover masking with Paintbrush, masking using the Colour Range selection tool, how to Move, Copy and Invert masks to other Adjustment Layers, how to adjust the Mask's Edge, and finally, using the Gradient Tool to mask.
Let's first start with some background. Layer masks are applied to specific layers and affect what part(s) of a layer (or Adjustment Layer) apply to the image, and to what degree. You can black-out entire parts of a layer, or reduce its effect by greying-out parts of the layer.
We discussed Adjustment Layers in another tutorial, but you are not limited to this kind of layer. One that comes to mind that I use frequently is copying the background layer. To do this, you first need to bring up the Layers window (Window > Layers, or press F7). Whether you only have one layer (your background layer) or several layers, simply right-click on the background layer and click Duplicate Layer...
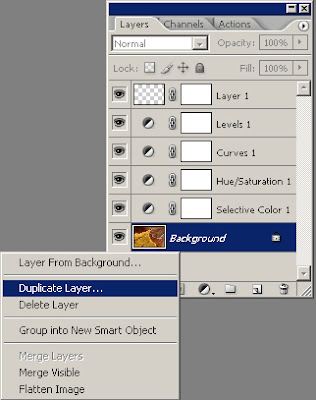
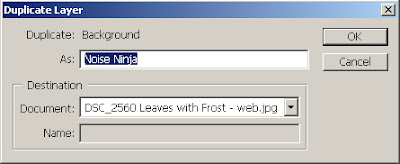
Then a window will appear where you can rename that layer. (Note: Any layer can be duplicated - I'm just using the background as an example.) You can rename the duplicated layer anything you like - I chose 'Noise Ninja' for this one because I was about to run Noise Ninja on it.
Sorry for the diversion - I just felt it would be handy to cover that quickly. Now, on to layer masks. Some layers (most Adjustment Layers) will have masks attached to them when you add them. In the layers window, masks are the white boxes to the right of the layer itself. If you need to add a mask (and layers can have multiple masks), click on the Layer Mask button on the bottom of the window - it looks like a front-load washer.
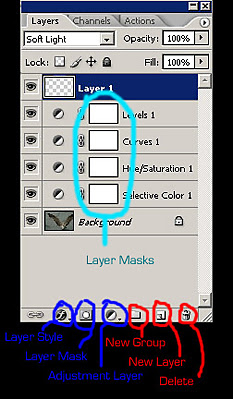
Blank layer masks have no affect on the layers they are on, so don't worry about having the mask there if you have not utilized it. Now, let's get to the fun stuff!
Masking with Paintbrush
Let's cover this with an example. Let's say you apply a Curves layer or Levels Adjustment Layer, but once it is applied, you realize there is part of the image you do not want that layer to affect. What to do? Go to your layers window, click on the mask (white box) next to the layer you want to mask. Now, take your paintbrush, set the size and opacity (Keyboard Shortcuts) you need, and paint with the paintbrush over the part of the image you want to change.
A couple of things should be noted here.
Layer masks only use shades of grey. If you try to paint using a specific colour, it will convert it to an equivalent shade of grey.
I find greys are most easily accomplished and adjusted by using black and painting with a reduced opacity. If you need to lighten the mask you applied, you can paint over it with white, either at full or reduced opacity.
Painting with white on a blank mask has no affect.
Be very cautious of brush edges - too hard an edge and you can clearly see where the mask has been applied. I find it is best to use a brush with a soft edge - the hardness being dictated by the task. Adjust the brushed edge by pressing Shift + [ or Shift + ]
If you want to see exactly where in the image the mask is applied, press Alt + Left-Click. To hide the mask's effect, press Shift + Left-Click
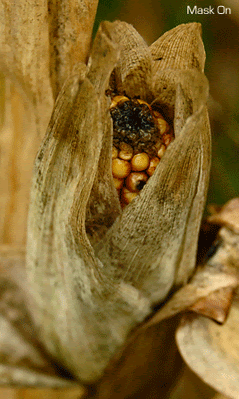
In the above image, you can see the image with no adjustment (layer off), the adjustment on (mask off), and the adjustment made with a mask applied (mask on). The adjustment here was a quick-and-dirty Curves Adjustment Layer, but it made the corn too dark - so I masked out the Adjustment Layer in that area. Tada! Just the effect I wanted!
Masking with Colour Range Selection Tool
This is a great tool, but takes some messing around. I use it most often when working on an image with a great range of contrast (sometimes when creating HDR images). For instance, if I was working on a landscape image where the sky was considerably brighter than the foreground, there would be some adjustments I would want only applied to one or the other. Using the Colour Range Selection tool makes using Layer Masks in this situation very easy, because drawing a perfect line between light and dark with the paintbrush can be tedious.
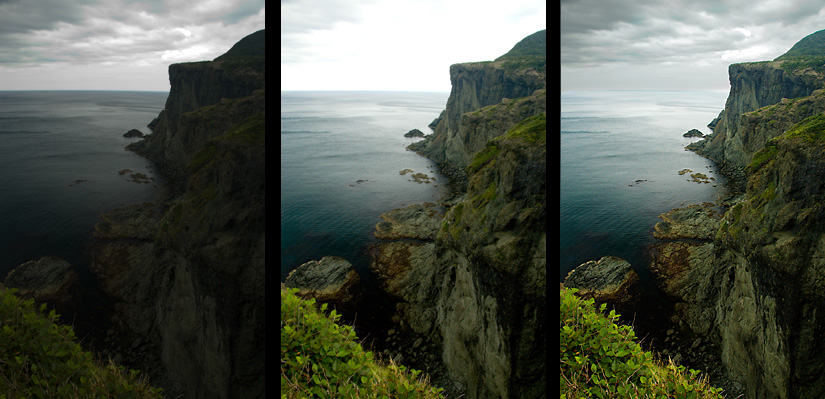
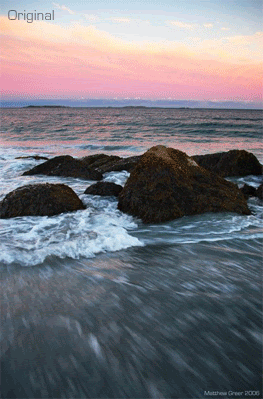
As can be seen in the image sequence above (of Bottle Cove, Newfoundland), the first image has the sky properly exposed, the second has the foreground properly exposed, and the third has the two components combined. How did I do it?
First, I had two images, shot on a tripod, the first exposed for the sky, the second for the foreground. (Actually, I shot in RAW and did the adjustment later, but you can do the same like I described.)
Then I opened both images in Photoshop. I wanted the 'foreground' image as my background layer, so I clicked on the 'sky' image, selected the entire image (Ctrl + A), copied it (Ctrl + C), then clicked on the 'foreground' image, and pasted (Ctrl + V) the sky image on as a second layer. It will be useful to rename the sky layer now - right click on 'Layer 1' in the Layers window, click Layer Properties, rename the layer to 'Sky' (or whatever you want), and click OK.
For now, turn off the 'Sky' layer (clicking the eyeball next to it in the Layers window).
Select the background layer, simply by clicking on it in the Layers window.
Now for the fun! Click Select > Colour Range in the Menu Bar. This window will appear:
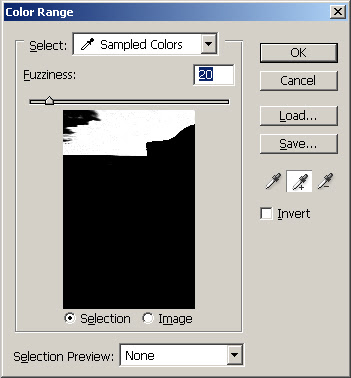
In this window, I prefer these settings starting off: in the 'Select' dropdown menu, select Sampled Colours; set the fuzziness to ~20 for now; from the two lower bullets, choose Selection; and in the 'Selection Preview' dropdown menu, choose none.
For the first part of the selection, choose the regular eyedropper (no symbol next to it), and click on part of the image (on the image itself - not in this window) you want to have masked (in this case, the brightest part of the sky).
Now, choose the eyedropper in the Colour Range window with the plus symbol next to it, and keep clicking parts of the image you want to mask. You will notice in the window that colour values similar to the ones you've selected have turned white. This is what you want to have happen.
If you click too much, reversing it is as simple as choosing the minus eyedropper, clicking on the part of the image you didn't mean to select, then return to the plus eyedropper and continue.
Once you have the main areas selected, slide the fuzziness slider back and forth to get as close as you can to getting all the desired areas selected.
Note: don't worry too much about getting large, open areas selected. You want to use this tool mostly for tricky borders. Also, don't worry if some of the selected sections are areas that you don't want masked - we'll cover that in the next step!
When you're finished, click OK in the colour selection window.
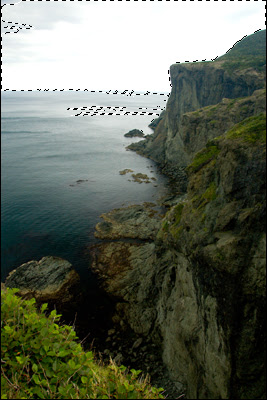
Now you'll see your image has some (or several!) selection line "zebras" on it.
Select either the Rectangular/Elliptical Marquee tool, or the Lasso. Then, just under the Menu bar you will see four buttons:
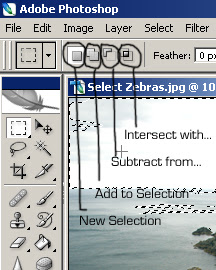
In this situation, we will choose Add to Selection first and select the top-left portion of the sky, making sure to select everything we need masked. Next, we'll take care of the ocean. Choose Subtract from Selection and draw an area around the part of the ocean that we do not want masked, but that is selected.
Go to the Layers window and turn on the 'sky' layer (click the eyeball 'on' next to it).
Now, click on the Layer Mask icon in the bottom of the Layers window (looks like a front-load washer). Instantly a mask will be applied to the 'sky' layer except where the selection was!
If you find the edges are too jagged, there are a few options. You could redo the steps above, but increase the fuzziness in the colour range window. Or, you could touch up areas using the paintbrush. Or, finally, you could read on to the section dealing with altering the Mask Edge.
Phew! Practice a few times - you'll quickly get the hang of it.
Move / Copy / Invert Masks
Once you've gone through all the work of creating a mask for one layer, you may want to apply it to another layer, or copy its inverse to another layer. Good news - it's possible, and it's easy!
Move Mask: To move a mask from one layer to another, simply click on the mask in the Layers window and drag it to the layer you want it applied to. Note: the mask will no longer be on the layer you moved it from.
Copy Mask: To copy a mask from one layer to another, Alt + Left-click on the mask, then drag and release it to the new layer. Now both layers will have the identical copies of that mask! (Note, changing one mask will not alter the other one.)
Invert Mask: Inverting masks is handy. If you've carefully masked an Adjustment Layer from affecting part of an image, and want a different Adjustment layer to affect the opposite part of the same it, first Copy the mask as per the instructions above - then click on the mask you want inverted and click Image > Adjustments > Invert (or press Ctrl + I).
Adjusting Mask Edges
If a mask edge (say between foreground and sky, like in the example above) has a line that is too sharp, you can adjust it number of different ways.
Gaussian Blur: A quick, simple way to soften the edge of a mask is with Gaussian Blur. It is a good idea to zoom the image to 100% for this adjustment (Ctrl + Space + Left Click zooms in, Alt + Space + Left Click zooms out). To do this, click on the mask itself, then click Filter > Blur > Gaussian Blur. Slide the 'radius' slider back and forth to get the desired effect. Note: be careful not to overdo this - too much blur can create a halo-effect between light and dark areas. Try making small adjustments, a few tenths at a time.
Max Filter: If you need the white (non-masking) part of the mask to be slightly bigger, you can use this. Access it by clicking Filter > Other > Maximum. As with Gaussian blur, adjust the slider by small amounts at a time, and be sure to view the image at 100%
Min Filter: If you need the black (masking) part of the mask to be slightly bigger, you can use this. Access it by clicking Filter > Other > Minimum. As with Gaussian blur, adjust the slider by small amounts at a time, and be sure to view the image at 100%
Note: You can use these options together, say by using 'max' or 'min' first, then softening the edge with a 'Gaussian' blur.
Gradient Mask
One final note on masks - using the Gradient tool to create masks. I generally am not a fan of this tool, but it does have its uses. I mainly don't like it because it's often obvious when it's been used. That being said, some people with more skill than I have, use it will wonderful results.
Gradient tool is similar to using the Paintbrush for masking. It can be handy if you need a mask applied to a layer with a fading straight line - say a horizon that you need masked completely at the top of the sky, and only partially where it meets the land.
To create this mask, click on the Layer Mask you want to work on. Next, select the Gradient Tool (hidden under the Paint Bucket in the Tools Window - click and hold the paint bucket and more options will appear).
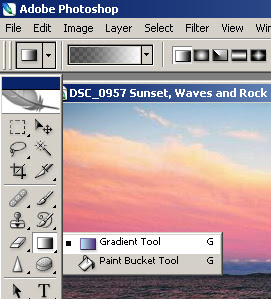
For this kind of masking, choose from the long drop-down menu the black-to-white checkered box (labelled 'Foreground to Transparent' when you mouse-over), and from the five mask patterns that follow, choose whichever one you want. I usually use the first - straight-lined - gradient.
Now, choose black from the paint pallet (press D for the default colours, and X if you need to change them. With black as the foreground colour, you will click and drag on your image - starting where you want the mask to be entirely black, and ending where you want to mask to be white (having no effect). The longer the mouse-drag, the more gradual the gradient.
It is handy to use Ctrl + Z as the undo function, and you try again and again (and again and again and...) to get the gradient the way you want it.
Remember again that you can still paint over this mask with the Paintbrush, or any other tool.
I hope this tutorial has been helpful. Please Email me if you have any questions, concerns, corrections or comments on this. I appreciate any help.
I've recently updated my website, and even made quick post of it here.
My next planned post is on image management - how to keep track of all the thousands of images on your computer - including naming them, saving them, and backing them up. There are lots of methods out there, but I'll be posting my method as a 'serious amateur'.
Thanks for you time.
Matt
11 comments:
Just to let you know the tutorials were greatly appreciated. Very nice of you writing and posting them. Thanks for sharing. Best!
Hey, excellent post. I've read a couple of your PS tutorials and they've been very helpful and educational. Thanks and keep it up!
Hi Matt,
Your writing and teaching skills are excellent and you generosity with your time and knowledge are immensely helpful to many others.
There is one thing about your site design that could be changed to benefit those of us with less than perfect visioin: Grays, dark blues, etc. on a black background have too little contrast for weak eyes to easily discern. Thanks.
Thanks for the kind words and suggestions. I'm always looking for ways to make my site easier to use, and make it more attractive. I'll play around with the colours in the next few days to see what I can come up with.
Matt
Many thanks for the useful, and well written tutorial. I was only recently trying to figure out how to move and copy masks, so found that information particularly useful.
thanks for the tutorial! awesome stuff.. im a total noob at this and im still having problems with painting on a layer mask - nothing happens! freakin annoyingly confusing. please help!
Hi 'anonymous'. Not really sure what to suggest for the masks. One thing to make sure of, make sure you have the mask itself selected in the "layers" window before you start paining.
Next, you'll want to check your brush colour (for masks, they'll only ever be shades of grey [or 'gray'], but its best to use either black or white). Then, check the brush size (make it bigger and smaller with [ & ], respectively. Then the hardness of the brush with SHIFT + [ or ]. Then the opacity (changed by moving the slider with the mouse, or pressing the number keys on the top of your keyboard).
Hope this helps. If not, drop me another note and we'll work this out together.
Thanks,
Matt
hey i checked the opacity and everything and when i was playing around with the mode i changed it from lighten to normal. now its working fine! thanks a lot!!!!!!!
Many thanks for the tutorial.
Before this tutorial I understood using masks with adjustment layers about 10%. After reading it - 40%. After following your steps using your photos - 60%. After playing with your photo and experimenting with random methods including yours - 73%. Sometimes, my mind still thinks backwards from what I am trying to do, though! Nice work. Loved it.
Thank you for the nice post........
Post a Comment