In this tutorial, we are going to create a custom paint brush. This technique has many uses - you can create a signature to apply to your images at any size or colour, or a particular pattern you want to be able to apply to your image. The best news - it's quick and easy to do once you know how.
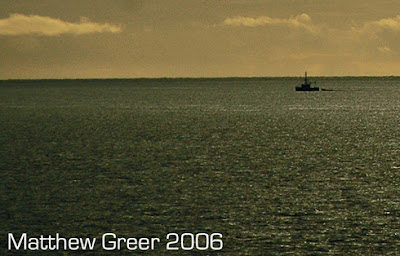
Above is the corner crop from one of my images where I have applied a simple signature. I only had to type those letters out once, then created a paintbrush for it. Now every time I want to use that, I can make it any size I want and any colour I want. Then one click and it's applied!
I'd like to go over one thing first. There are several Keyboard Shortcuts that assist when using the paintbrush. Follow that link to view them.
First we are going to start with a new canvas in Photoshop (File > New > New Image or Ctrl + N). Be sure to make the background contents transparent, so the spaces in your paintbrush allow the background to show through.
Make the new image fairly big - it's better to have a big paintbrush that you can later make smaller, than to have a small paintbrush that you have to distort to make bigger. If you are creating a signature paintbrush, I would recommend a canvas at least 1,000 pixels across, and however high you need it to be. I believe your brush will max out at 999 x 999 pixels, so there is really no need to go beyond this max. We don't need to use the entire canvas either, though, so feel free to give yourself room.
You can now create any pattern or image on the canvas you want. You can even use part of an existing image, if you like. For me, my main use was creating a quick and easy signature brush.
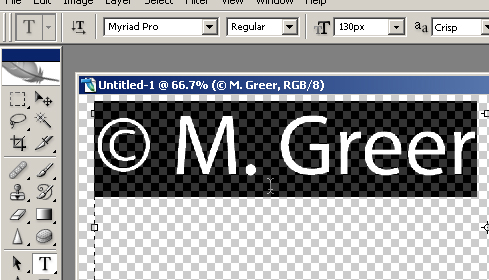
I used the text tool, T, and with black and 100% opacity, wrote out what I wanted for my signature. Black is good to use the first time around as it is solid and clear - you can change the brush colour to anything you want once the brush itself is created.
Note: To create the Copyright (©) symbol, press Alt + 0 + 1 + 6 + 9 on the keypad.
Here's the step-by-step from here on in:
You do not want to flatten the image, as this will make the background white. Then every time you use your brush, it will have a while box around it.
Now, select the area of the image you want to use as your brush with the Rectangular Marquee tool (M). Make sure you are making the selection from the layer with detail on it - view layers in the Layer Window, Window > Layers.
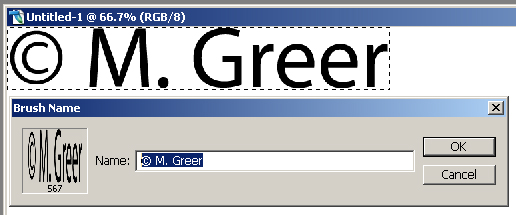
Now click Edit > Define Brush Preset and name your brush whatever you want (I prefer specific names, because sometimes the brush icon isn't clear for large brushes).
That's it - you're done!
Now, to use your custom brush:
Select the brush tool (B).
Open the brush pallet (F5 or right-click on the image while using the brush tool).
Click on your custom brush to select it. To close the pallet, press F5 again or Esc.
Choose any colour you want from the colour pallet in the Tools window. You can adjust the opacity with the slider at the top of the screen, or by entering a value (pressing 1=10%, 2=20%, 3=30%, etc.).
You can adjust the brush size in the top toolbar as well, or by pressing [ to make it smaller, and ] to make it larger.
Quick. Simple. And you're no longer restricted to the brushes provided to you. I hope this has made your life a little bit easier!
Thanks.
Matt
4 comments:
Thanks for posting that.
Learn something new everyday.
Nice of you to take the time..
Pete
Hey, thanks man! I'm only 12 and I needed this help! I still am having probs but atleast I know how now!
Kudos to you!
Very helpful, thank you :)
What a perfectly clear tutorial! Thanks. It helped me tons!
Post a Comment