This has been a long time coming, but it's finally here! A tutorial on the whats, hows, and whys of hyperfocal photography.
What is Hyperfocal Photography?
First, let's cover what hyperfocal photography is. Simply put, hyperfocal photography is when you adjust the aperture and point of focus so that everything from a desired point (usually the foreground) to infinity is in focus. It takes work and an attention to detail, but mastering it and becoming efficient at it can certainly improve certain aspects of your photography.
How is Hyperfocal Photography Achieved?
Calculating hyperfocal distance can change depending on a number of factors, and different cameras and lenses have different ways of helping you figure out the hyperfocal distanc.
Factors affecting hyperfocal distance include focal length (wide angle lenses have a greater depth of field than telephoto lenses), distance to nearest subject (two distant objects will have a smaller hyperfocal distance than a near and far object together), and sensor size (the smaller the sensor, the greater the depth of field).
In order to calculate hyperfocal distance, there are a number of different things cameras and lenses have that can help you.
Hyperfocal Lens Markings
Some lenses (this seems be more the case with older lenses) have markings on them showing the hyperfocal distances for different apertures. An example of this is shown in the image below.
In the image below, you can see that the lens is focused to 8'. On the barrel, you can see two vertical markings on either side of the focus point line - two lines correspond with the number 11, and two with 16.
These lines tell you that when you have the lens focused at 8' and the aperture set at f/16, everything from 6' (on the right of the scale) to 12' (on the left of the scale) will be in focus.
Adjusting the focus ring on this lens will change the hyperfocal distance (the area that is in focus) for a given aperture. For instance, you can see that with this lens, setting the focus point to 12' would give you DOF from 8' to 20'.

Using DOF rules and your LCD
There is a simple Depth of Field (DOF) rule that will help make hyperfocal distance calculations easy - your DOF is always 1/3 in front of the focus point, and 2/3 behind it. What that means is that if you focus on something 10' away and your DOF (area in focus) is 3', everything from 9' to 12' will be in focus.
Using the above rule, you can resort to trial and error to achieve the desired hyperfocal distance. Set an aperture that will give you a large DOF (usually at least f/11, but you will need lots of light (or a tripod, which is a good idea anyway) to freeze action, or a static subject), set your focus 1/3 of the way past where you want your DOF to begin and where it will end. Shoot. Look on the LCD to see what was in focus. If not enough, you'll need a smaller aperture (larger f/ number); if too much, then you'll want a larger aperture (smaller f/ number).
Using Your DOF Preview Button
Many SLRs these days have a DOF preview button (read the user's manual for your camera). To use this, set the aperture you want to use and press the button. The viewfinder will become darker, but you will see how much of the image is in focus.
With the DOF preview button pressed, adjust the focus ring until the desired hypefocal distance is achieved.
If you cannot get the hyperfocal distance required with a particular aperture, close down the lens some more (increase the f/ number) and try again.
Use Specially Designed Cameras
Some cameras will use their software to get the settings right for a given hyperfocal distance (check your camera's user manual). You can set the front and back point to be in focus and the camera will set the aperture and proper focus point to get the entire range in focus.
I have only ever heard of this feature on Canon cameras (and not all of them), but it may be in other cameras too.
Another Helpful Rule
This rule can be used with the all of the methods above. Set your lens to focus at infinity, set your desired aperture, then check to see the closest point in focus (check the hyperfocal marks on the lens; take a picture and check the LCD; or press the DOF preview button).
Now, set the lens' focus to the closest focused distance noted in the previous point.
The area in focus will be from half to new focus point all the way to infinity (assuming the same aperture).
There is a lot to remember here, and it may seem confusing. It's important to practice this and truly understand hyperfocal distance. Try sitting at your computer with your camera and try the rules with objects you have around you. Read a rule, practice, ask questions!


These two sets of images show (from left to right): focusing only on foreground; focusing only background; focusing using hyperfocal distance calculations (discussed above).
These two sets of images show (from left to right): focusing only on foreground; focusing only background; focusing using hyperfocal distance calculations (discussed above).
Why is Hyperfocal Photography Important?
Hyperfocal photography is by no means the be all and end all of photography; many times you will actually want to have some or most of the image out of focus. However, mastering and achieving hyperfocal technique can really help your photography.
You may have a group of people, several bodies deep, that you need to photograph. You'll want to get them all in focus! If you do landscape photography with a wide angle lens, it is often important to have something in the foreground to draw the eye and give a sense of scale in the image - all the better if you can actually see detail in the foreground object without losing detail in the rest of the scene.
You can also use hyperfocal photography to keep elements of a scene out of focus! Knowing the rules and principles of hyperfocal distance can help you ensure you don't get too much of the scene in focus.
I leave you with a few of my images where I used hyperfocal technique.

A trail in Banff National Park called Eiffel Lake (near Moraine Lake). Shot with Nikon D70s, Sigma 10-20mm at 14mm, f/16.

Sibbald Lake trail in Kananaskis. Shot with Nikon D70s, Sigma 10-20mm at 10mm, f/16.
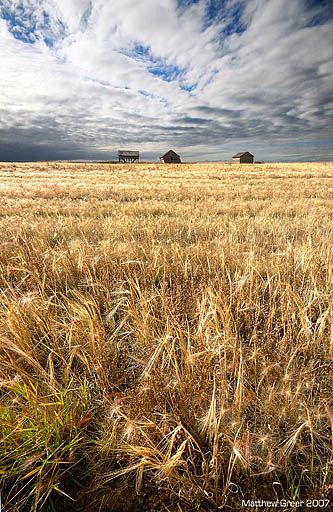
Wheat field on the highway south of Calgary, Alberta. Shot with Nikon D70s, Sigma 10-20mm at 10mm, f/18.
As always, if you have any questions or suggestions, I'd love to hear from you.
A trail in Banff National Park called Eiffel Lake (near Moraine Lake). Shot with Nikon D70s, Sigma 10-20mm at 14mm, f/16.
Sibbald Lake trail in Kananaskis. Shot with Nikon D70s, Sigma 10-20mm at 10mm, f/16.
Wheat field on the highway south of Calgary, Alberta. Shot with Nikon D70s, Sigma 10-20mm at 10mm, f/18.
Thanks.
Matt
10 comments:
Thanks for sharing. Nice last picture.
your back!
but your a towel???
luv your b - o - s - s
Thanks Matt, great pictures and a clear explanation.... I'm really considering the Sigma 10-20 at the moment, would you recommend it?
James - I definitely would recommend the Sigma 10-20. I've heard stories about bad samples (usually one side or the other), but it's been a while since I've heard them. It does help to stop down to f/8 (read the review on www.photozone.de under the Canon lens section).
I was able to get mine used with a good UV filter (475 Canadian, original packaging, mint condition). If you're in Canada, check out www.kijiji.ca
Good luck!
Thanks Matt, I did buy one, but it must have been a bad copy because even at f8 and f11 it wasn't sharp in the centre which was very disappointing! Fantastic field of view though... I'll try another before I give up.
Matt - Its andy - Cant find your email address - I want to buy a digital camera - cool looking and as slim as possible - any suggestions?
~andyhowes.com
Matt. I think your Blog is great. I'm sure you are a busy guy, but I find your posts to be extremely useful and would love it if you posted more often. I just started my photo blog and I will be referring people here once I actually have visitors :)
Thanks for sharing your knowledge!
Thanks - put on to third site by someone - lear instructions and lovely pictures
Angela
Hi, I found your blog in a search for some explanations on hyperfocal distance. I have a question about the fence photos, ("Maer"): to achieve the focus in the last photo, why couldn't you just manually focus until this image is achieved? I am a new student to photography, so please forgive me if the question has an obvious answer, and thanks for the blog!
Hi anonymous.
Focusing manually certainly would help in this situation. The challenge is to find the correct point to focus on, along with the correct aperture, so that you have all the items that you want in focus in front of and behind your focus point.
Post a Comment