Update Jan 9 /07: I've added a section here on loading pre-made actions.
In the last post, I talked about adding layers to photographs. In future posts, I will talk about how to use these layers in editing photographs.
In this post, I will talk about how to add these layers to photographs using something called actions. Running Actions can be applied to just one photo, or you can add layers to all the pictures you have open (or all the pictures in one folder) using Batch Processing.
Creating Actions
To create an action, first open an image (any image) in Photoshop, then click Window > Actions. The window shown below will open.
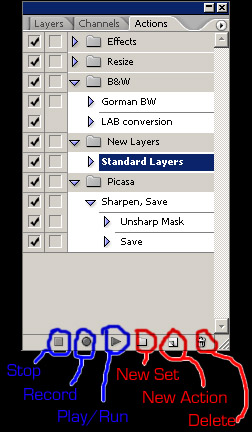
Note: if you want to add several tabs to this one window (as in the above image, where Layers, Channels and Actions are together), simply open each window (clicking Window > "desired window"), then with all windows open, simply drag the tab of one window into another window until they are all consolidated.
Now, click the folder icon on the bottom of the Actions window (labeled "New Set") and name it "New Layers" (or whatever you want to call it). Then click on the turned up page icon (labelled "New Action") and name it "Standard Layers". This will begin the recording of the action automatically.
You can stop and start the action recording at any time by pressing the Stop and Record buttons, respectively.
I discuss the adding of layers in the previous post, Adding Layers. You can follow the steps in that post to create this particular action.
Once you have completed all the necessary steps in the action, simply click the Stop button.
Tada! You've just completed recording your first action in Photoshop!
Running/Playing Actions
Open the Actions tab, or click Window > Actions. Open the "New Layers" folder and click on "Standard Layers". Click the button labeled "Play". In just a few seconds, Photoshop will add all the layers to your photo, with all the blending modes, just as you specified. In one click!
Now, to use the layers (as I will discuss in future posts), click on the Layers tab, or click Window > Layers to begin editing.
Batch Processing
Batch processing requires that you have an action set up already, as I discuss earlier in this post.
Note: The following instructions deal with running the above mentioned action specifically. If you create an action that requires the image to be saved as part of the action, then separate steps need to be taken.
Note #2: These actions cannot be run on RAW files!
Click File > Automate > Batch... and the following window will open:

In the part of the window labeled Play, select Set > New Actions and Action > Standard Layers (or whatever you've called your actions set). Then in the part of the window labeled Source, select either Open Files or Folder, whichever has the images you wanted "Actioned" in.
In the part of the window labeled Destination, select None, as you do not want anything else to happen to the images at this point.
Now click OK and the action will run on all the images.
Just as when you ran the action on one photo, you can go ahead and edit your photos with the layers you've added. Simply go to the Layers tab, or click Window > Layers.
Loading Actions
One great feature about actions is that you can save them and share them with others. Obviously, this means you can get saved actions from other people, too. One site with many great actions is Action Central. You can download actions from there and run them directly in Photoshop. Setting them up is straight forward.
If you get an Action from the web, it is usually in a Zip file. First you'll need to unzip the file (with a program like Winzip or with WinXPs extractor).
You can extract the action anywhere you like, but I would recommend making a folder in your Photoshop folder (C:\Program Files\Adobe\Adobe Photoshop CS2\) called "Actions".
To load the action into Photoshop:
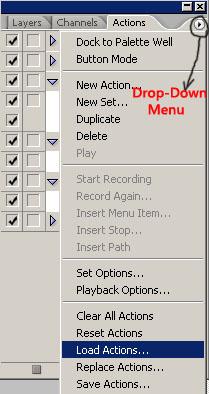
Open the Actions window (Window > Actions or Alt+F9).
Click on the triangle-in-circle in the top-right corner.
Find the action wherever you saved it on the hard drive (not the Zip file, the action itself - it is a .atn file).
Then click on the file and click Load.
Now, if you want, you can rename the action by double-clicking on it and renaming it. Similarly, you can rename the folder (set) the action is in the same way. Or, if you want to put the action in another folder (set), you can click and drag it to where you want it in the Action window.
You can also delete the action or folder by clicking and dragging it to the trash can in the lower-right corner of the Actions window.
Saving Actions
Finally, if you want to save an action (to either share with other people, or to back up somewhere in case your hard drive crashes), simply select the folder (set) of the action, click on the triangle-in-circle in the top-right corner of the Actions window and select "Save Actions...". You have to do it by entire set - not just one action at a time.
More specific editing techniques will follow in the weeks and posts ahead. In the mean time, feel free to check out my website: http://www.picasaweb.google.com/mgreerphoto. If there is any image you want to know the editing procedure to, let me know at nikonmatt@gmail.com. I may be able to make that the topic of a future editing post.
Thanks!
Matt
6 comments:
Once again, an excellent and well written tutorial. Thanks for sharing it.
Thanks so much for posting this. I was having a hard time figuring it out for myself, so this was a lifesaver. This is one of the best tutorials on the subject.
Thank you very much. This is exactly what I needed to know and very concise and helpful.
whats the difference between using batch vs. using droplets?
Thanks for the "droplets" question. To be honest, I didn't know what a droplet was before now. But after a little research...
Droplets use actions, just as batch processing does. With 'droplets', you simply drag and drop an image file onto the 'droplet' .exe file (as if it was a folder that you were dragging it into).
Batch processing looks as though you can tweak the output destination and naming each time, whereas 'droplets' have those settings pre-determined.
If you're happy with your droplet settings, it seems like a great feature to use. Drag, drop, then go brush your teeth while you wait!
Thanks for pointing out something new to me, 'anonymous'.
Just what I wanted. perfect. Thank you. :)
Post a Comment