Showing posts with label Actions. Show all posts

Tuesday, December 19, 2006

Photoshop Adjustment Layers - Curves

Hi there.

I've been looking forward to doing this tutorial since I started the blog. We will be covering Curves - including adjusting brightness and contrast with simple and complex curves, and adjusting colour balance using curves. Curves is a very powerful tool and is a big part of what (I believe) Photoshop and post processing is all about. There's much to cover, so let's begin.

Background Information


Let's cover a little history first. In a previous post, I talked about what my most common Adjustment Layers were, and how to quickly add them with Batch Processing. I will quickly cover adding a Curves adjustment layer here, but it would be a good refresher to go over those tutorials quickly.

I'd like to go over four quick point that I think will make using curves easier for you.
  • Pressing Alt + Left-Click in the curves window will switch back and forth between a small and a large grid. I prefer a small grid as it allows for more visual accuracy.

  • Clicking the icon in the bottom right-hand corner of the window will alternate between a big and small window. Again, I prefer a bigger window for better accuracy, so long as I don't need the screen space.

  • If you have added a point on the curve that you want to get rid of, simply click on it and drag it into an adjoining point - either the white-point or black-point on the curve, or another point you've already created.

  • If you have created a complicated curve that you want to reset, the easiest way to do so is hold down Alt and Left-Click on the Cancel button. Note that Cancel becomes Reset with the Alt button pressed.

  • We will start in Photoshop CS2. First open an image you want to adjust the brightness and/or contrast of. Now, you can either run an action to apply your adjustment layers, or you can click on Window > Layers, then click the New Adjustment Layer icon in the bottom of that window (half black - half white circle) and select Curves. For now, click OK on the layers window, because we are going to change the blending mode of the curve.

    In the drop-down menu under the Layers tab (where it currently says 'Normal'), select Luminosity from the list. This will help prevent posterization from occurring between colour and tone transitions.

    One last thing to do before we begin - the histogram. This is a chart that tells us how much information is in the black point and shadows (left part of chart), the midtones (middle of chart), and highlights and white point (right of chart). To bring up the histogram, click Windows > Histogram. Then in the drop-down menu histogram window, choose Luminosity as this will show your actual brightness values. RGB simply shows the combined values of the Red, Green, and Blue levels and is not an accurate guide to the brightness values of your image. Note that this window will stay open until you close it - though you will often need to change the mode back to Luminosity.
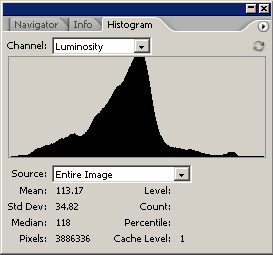


    Not every histogram will look like the one above - it will change depending on the brightness values of your image, and will change as you make adjustments to your image.

    When changing the brightness or contrast of the image, try to make sure no part of the histogram gets all the way to the left or the right - if it does, that means you have lost information to completely black shadows (left), or blown out hightlights (right).

    Altering the Curve


    Now, on to the editing of the image!

    Back in your Layer window (Windows > Layers), double click on the half-black, half-white circle next to the Curves Layer. That will bring the Curves window back up.
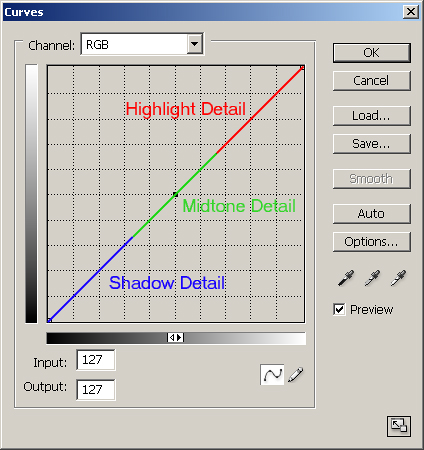


    I have highlighted the major points of the curve above. The leftmost point on the curve is the black-point (where detail in the image has no lightness whatsoever); the lower portion of the curve is the shadow detail; the middle portion is the mid tones; the top portion is the highlights; and the rightmost point is the white-point (where detail in the image is completely white, with no other detail). Clicking and dragging different parts of the curve will affect the brightness values that correspond to that part of the curve. Be aware that moving one part of the curve can change values throughout the curve - just like moving a point on a taut piece of string will affect other points on that string - though to a lesser degree.

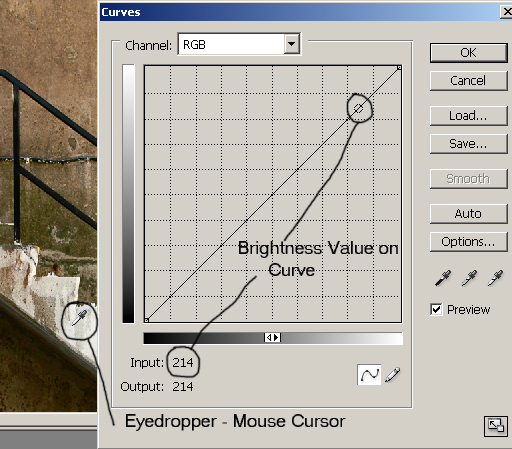
    You can see in the bottom of the curves window Input and Output values. These are brightness values.
  • 0 is no brightness, or complete black.

  • 255 is the highest value, or completely white.

  • When you click a point on the curve, the Input value is what the brightness was before you made any adjustments. Logically, the Output value is the brightness after the adjustments are made.

    The idea behind adjusting brightness with curves is fairly straightforward:
  • To make a given brightness value brighter, click on that part of the curve and drag it upwards (increase the value).

  • To make a given brightness value darker, click on that part of the curve and drag it downwards (decrease the value).

  • Before we start to edit an image, I want to cover one more thing. Contrast. The slope of the curve changes the contrast. With just a bit of logic applied, it makes sense.
  • The steeper any given part of the curve is, the more contrast it has. That is because you are increasing the bright values and decreasing the dark values - thus making a bigger difference between the two.

  • The flatter any given part of the curve is, the less contrast it has. That is because you are decreasing the bright values and increasing the dark values - thus decreasing the difference between the two.

  • Adding Contrast


    Now, here is a fairly straightforward image that I want to add contrast to.
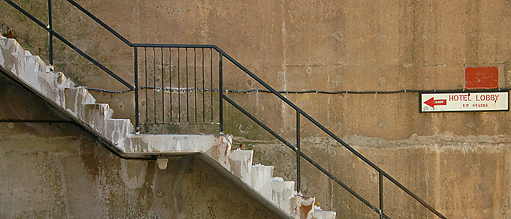


    Just by looking at the image, you can see that the brightness values are fairly neutral - nothing particularly close to white, nothing particularly close to black. To be sure, though, there is a way to check.

    With the Curves layer window open, move the mouse cursor over the image. It will turn into an eyedropper automatically. Now, as you click and drag the mouse over the image, you will see or dot or circle move up and down the curve in the curves window. Wherever the dot is on the curve is the brightness value of that part of the image. If you want to brighten or darken a part of an image, this will tell you where to raise or lower the curve, respectively.

    You can also increase the contrast of a certain tonal range by finding the brightest and darkest values in an area (click and drag the mouse around that part of the image - take note of the darkest point on the curve, as well as the brightest point).
  • To add contrast to the area, raise a point on the curve just to the right of the brightest point in that area, and lower a point on the curve just to the left of the darkest point in that area.

  • Conversely, to decrease the contrast in the areas, lower a point on the curve just to the right of the brightest point in that area, and raise a point on the curve just to the left of the darkest point in that area.

  • In the image of the stairs above, the brightest value in the image had a value between 215 and 220 (just over a cm (~1/2 inch) from the rightmost point on the curve), and the darkest value was between 30 and 35.


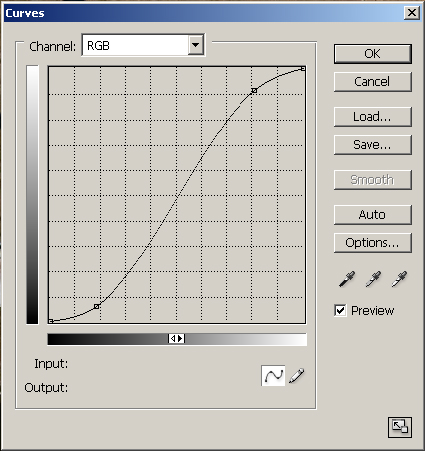
    So to increase the contrast in this image, I created an S-Curve. This increased the highlight values, and decreased the shadow values, into a curve that looks like this:


    The final image looks like this:
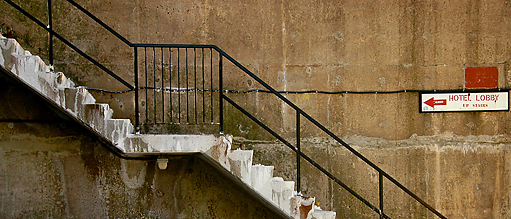

    Shot with a Nikon D70s and Nikkor 18-200mm VR, 1/180s, f/6.7


    You can see how the contrast was increased. Bright values became brighter, and dark values became darker. You can vary the effect by increasing or decreasing the points on the curve.

    More Complex Curves


    The above example was altered using a very simple curve, but not all images will be that easy to adjust (and to be honest, even that image could use some finer adjusting, but I feel it illustrated the power of simple S-Curves well). Some images may need curves that have several adjustment points. Take the following before-and-after example:
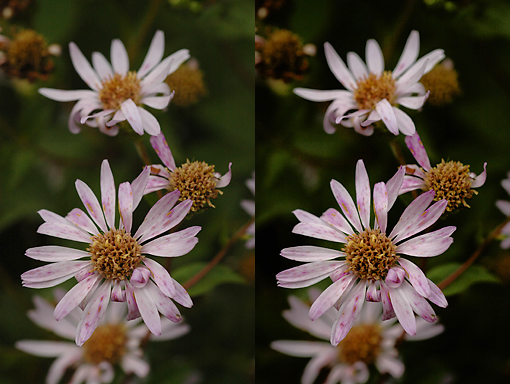


    In that image I wanted to:
  • Add a little more contrast and brightness to the highlights (the flower petals).

  • Leave the contrast and brightness of the midtones (center of flowers) alone.

  • Darken and increase the contrast of the shadows (background).

  • Of course, backgrounds may not always be the darkest part of the image, and highlights may not always be the focal point, but they were in this situation.
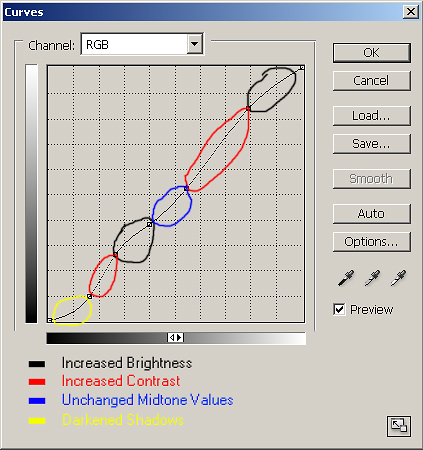


    In the above screenshot you can see the curve I applied to the image to help separate the flowers from their background.
  • The Black areas have increased the brightness values in those parts of the image - the points on the curve are higher (and thus are brighter) that on the standard linear curve.

  • The Red areas have increased contrast in those parts of the image. Remember that the steeper the curve, the higher the contrast. Brighter brights + darker darks = increased contrast.

  • The Blue area has the same brightness and contrast values that the original image had. All the points along that part of the curve are where they were in the original linear curve.

  • The Yellow area is darker than the original image (and, though darker, has less contrast because the curve is flatter - though it is hardly noticeable in this image) because the values on that part of the curve are lower than they were on the original linear curve.

  • This is just one of the infinite number of curves you can apply to images. There are a few more things you can do with curves once you've gone beyond the basics:
  • Add multiple layers to the one image. Sometimes this is easier than adding one very complicated curve. Note: watch out for posterization, or overdoing the brightness and contrast values. Check the image at 100% before you are finished.

  • Use Layer Masks on one layer, or multiple layers, to get the desired effect.

  • If there is a curve you want to apply to multiple images, you can copy that Curves Adjustment Layer from one image to another by pressing Alt + Left-Click and then dragging that layer to the other images. Or, you can create an Action to apply the adjustment to several images.

  • You can decrease the strength of your curves layer by decreasing the Opacity in the Layers window.

  • Adjusting Colour Balance with Curves


    Finally, one of the amazing things curves can do is adjust the colour balance. With curves alone, you can make this adjustment:
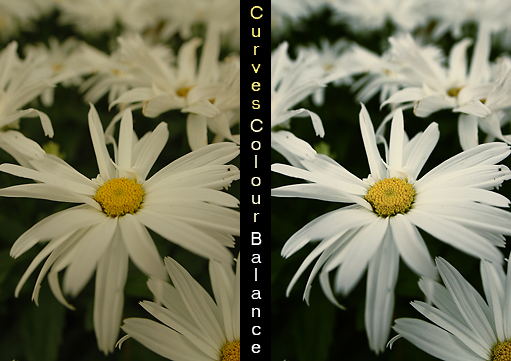


    To do this, create a Curves Adjustment Layer as per normal. In the Layers Window, (Window > Layers), select New Adjustment Layer > Curves. My preference is to select OK at this point, and rename the layer so I know it is for Colour Balance. Right-click on the layer, select Layer Properties, and change the name of the layer to 'Colour Balance'.

    Note: Make sure you change the blending mode to Colour so your changes won't affect the the brightness or contrast of the colours.


    Before you go back into the curves Colour Balance layer, you need to bring up the Info window. Click Window > Info. Now, when you move your mouse over the image, it will show you the per-pixel value for each of the Red, Green, and Blue channels. Try to put the mouse over a part of the image that should be a neutral colour (greys or whites). In the Info window, neutral values should have equal amounts in each channel.
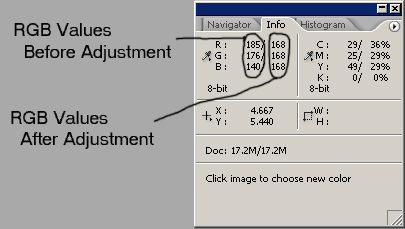


    If, as in the example above, the "before" values have high levels of red, and low levels of blue, then we know we need to decrease the red, and increase the blue. Simple!

    Now, go back into the Curves layer (double-click on it) and, from the drop-down menu, select Red first.
  • If it is the highlights that need adjusting, change the values in that part of the curve (right-most area).

  • If it is the shadows that need adjusting, change the values in that part of the curve (left-most area).

  • If the entire image needs adjusting, I generally begin by adjusting the values in the middle of the curve. If further tweaking of the highlight or shadow areas is needed, I will add those adjustments.

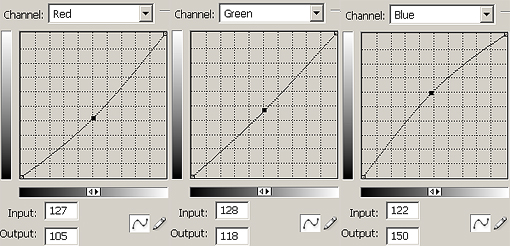
  • This part of adjusting is largely a matter of alter-check-repeat. In this case, I would decrease the red values slightly, put my mouse back over the neutral part of the image, see if the red was closer to the norm, and test again. The "changed" values are shown after the "native" values, with a slash in between them.

    The necessary adjustments would be made to the green and blue channel, if necessary. All channels can be adjusted with the one Curves layer - simply select the channel you need to alter from the drop-down menu, make the changes, then select the next channel you need to alter, and so on. Here are the screenshots of the altered curves for each channel (R, G & B) for the above image:


    And this is the final image after the adjustments:


    Shot with a Nikon D70s and Sigma 20mm f/1.8, 1/1250s, f/4


    Addendum - White Balance with Eyedropper


    I just posted a link to this tutorial on the DPReview forums, and Andrew from the UK posted some advice for me on achieving more accurate white balance using curves.

    Andrew pointed out that the petals in my above Daisy photo still had a slight yellow cast, and were still underexposed. He suggested (and I feel he is absolutely correct in this) the following (and I added some small details along the way):
  • Create a new Curves Adjustment Layer; rename 'Colour Balance'; Blend Mode: Normal.

  • Select either the Black-point, Grey-point or White-point eyedropper from the Curves window (see image below).

  • Click on a part of the image that corresponds with the eyedropper chosen (in the case of the daisy photo, I used the White-point eyedropper and clicked on the brightest part of the petals).

  • If you do not quite have a white-point of black-point in your image, you can double-click on the corresponding eyedropper and choose the appropriate shade of grey from the colour pallet.

  • Tada! That's it! You've set an accurate White-point, thus correcting the colour balance, and you've corrected the exposure (assuming the point you clicked on was actually supposed to be white).
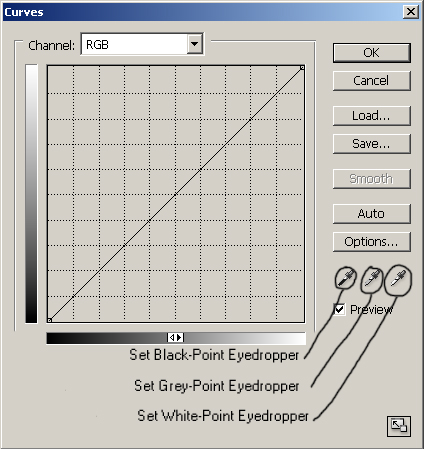


  • If you don't get the exact point correct with your first click, keep clicking around until you get the correct shade. Also, if the White-point you selected poorly affects the brightness and contrast of your image, you can still adjust the RGB (not individual channels) curve in the same window.

    I do still feel the first lesson taught in this colour balance section is valid, as it can be used for fine tuning, and also helpful when pure whites, greys, or blacks are not in the image. But Andrew's method is clearly far more powerful.

    So, thank you very much Andrew. You've been a big help. Now, let's see what his assistance did to the daisy image!


    Again, thanks for the help Andrew!


    We covered a lot in this tutorial. From standard S-Curves for adjusting brightness and contrast, to applying more Complex Curves to images that require them. Last, and certainly not least, we covered how to adjust Colour Balance using curves.

    I will cover other colour-balance techniques in a future tutorial.

    I do hope this tutorial was helpful. As always, please Email me with any questions, comments, corrections, or suggestions.

    Thank you.
    Matt

    Friday, December 08, 2006

    Batch Processing to Folder

    Welcome back!

    In my last post, Actions and Batch Processing, I talked about how to add adjustment layers to a group of images using batch processing. In that tutorial, the images were neither saved nor outputted to a specific folder. I had a number of requests for instructions on how to batch process with Source > Folder and Destination > Folder. So, while this set of instructions is fairly wordy, it is meant as a sub-tutorial to my last one.

    Let's start off with a bit of background. If there is a series of commands you apply to images on a regular basis, and you do it the same way every time, you can set up something called Actions. Some examples of this would be flattening layers in .psd images, changing the colour space, resizing them for web, and adding Unsharp Mask, or a black and white conversion method you like for portraits that has several steps. You can create actions for this that will run the commands on images automatically. Then, if you want to perform those commands on a specific group of images (either a group of images you have open, or all the images in one folder), you can do so with Batch Processing. That is what we will talk about now.

    I am assuming now that you already have an action created. The first time you do this, it is a good idea to copy several images into a test folder so you can run through these steps without having to worry about doing something bad (and likely permanent!) to your original images.

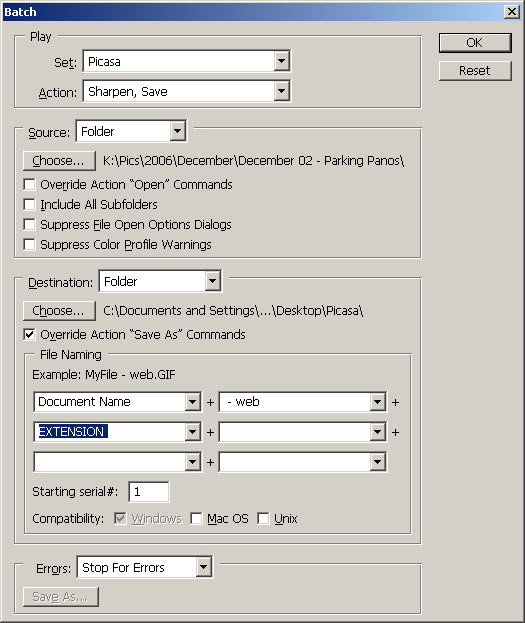
    With Photoshop CS (or CS2, which is what I based this tutorial off), click File > Automate > Batch. This window will appear:

    Play box: Choose the set and action that you want applied to the group of photos.

    Source box: Choose either Opened Files (Note: This will apply the action to all images open in Photoshop) or Folder.
  • If Folder is chosen, be sure to select Override Actions "Open" Commands if 'Open' is part of your chosen action.

  • Decide whether you want to include subfolders or not.

  • Choosing Suppress File Open Options Dialogs will cause Photoshop to steamroll through this step. ie: the File > Open options window will not appear for you. You decide if you want to select this option.

    (Note: I don't have the Open command as part of any of my actions.)

  • Suppress Colour Profile Warnings may be a good one to leave unchecked as you could lose colour information (and thus image info), forcing the image from its native colour space into another.


  • Destination box:
  • None is what we covered in the Actions and Batch Processing tutorial. Use this if your action does not have Close as the final step, and if you want to keep working on the images after the action has run.

    (Note: for actions that require further work after the action is applied, I like to omit the Save command. This is just my preference.

  • Save and Close will save the images back where they came from and overwrite the originals. I prefer to keep my originals as is.

    (Note: if you have created layers, or your action adds layers, make sure to add Layers > Flatten Image as part of the action, or saving as a .jpg or .tif will not work.)

  • Folder is my preference. You can choose the same original folder, but with the steps below change its file name easily! Now, choose your output folder. I recommend changing the folder if the images are batch processed for a one-time use (ex: uploading to a website, then deleted from hard drive) or if you do not rename the images somehow. I always prefer to rename a newly saved image no matter where I put it (ex:img-sharpened.jpg, img-web.jpg, img-b&w.jpg, etc.).
  • If part of your action is to Save, then be sure to check Override Action "Save As" Commands or every picture will be given the same name as the file you saved when you first created the action. This "feature" is just one more reason not to save the new files in the same place as the originals. If you just did work on 30-odd images and were batch processing the same action on all of them as the last step, they could be lost as they'd all be saved to the same file name, and thus overwritten.

  • File Naming sub-box: You have some flexibility here, but for the sake of file management, here's what I do: keep the original name (titled Document Name) in the first drop-down menu, then in the second drop-down menu, add a space-hyphen-space then a word/phrase (ex: - web, or - sharpen). I like to keep out-of-camera file names attached so I can more easily find the originals later.

  • You can keep adding more options in the drop-down menus. And you don't need to keep the original file name, either. You could have 'Sunday Brunch' (just an example) as the beginning of the file name (and thus the common denominator in all the images about to be batch processed), then use a serial (1, 2, 3, 4 Digit Serial Number or Serial Letter) from the drop-down menu to consecutively number all the images. To completely rename the images, just type whatever name you want used in the first drop-down menu.

  • You can even add the date to the image, though if you do, I would definitely recommend adding a serial to it iff you had the whole series completely renamed (ie: if they all say "SundayBrunch061106", you'll need something to follow to differentiate them. Again, this is why I keep the "DSC_####" as the prefix on all my edited pics.)

  • Finally, choose Extension as the option in the last drop-down menu. This will automatically put the file extension on each image. (Don't worry that the example given says ".gif" - it will not make them gifs unless you tell it to. Saving a jpg will keep it a jpg.)

  • The Starting Serial tick-box only comes into play if you select Serial Number or Serial Letter from the drop-down menus. You can have your images start numbering from wherever you like.


  • Compatibility: I use a PC (with WinXP) so 'Windows' is selected by default for me. Checking the others makes sure the file names will be recognized on the other respective systems. I don't check the others, and have never had a problem. My primary concern is having my images work on my system, and follow the file-naming scheme I create for them.

    Errors box: I prefer it to Stop for Errors, such as trying to save a jpg that has layers (can't be done!), because sometimes I rush and make a mistake. This will not catch all your errors (such as overwriting the same file, over and over again - remember Override Action "Save As" Commands from earlier?), but still helps. It hasn't caused me any problems (other than occasional self-doubt!).

    When finished, click OK, and you're finished!

    I do hope this was some help. If I was unclear or mistaken at any point, or if you want more information added, please Email me.

    Thanks.
    Matt

    Sunday, November 26, 2006

    Actions and Batch Processing

    Update Jan 9 /07: I've added a section here on loading pre-made actions.


    In the last post, I talked about adding layers to photographs. In future posts, I will talk about how to use these layers in editing photographs.

    In this post, I will talk about how to add these layers to photographs using something called actions. Running Actions can be applied to just one photo, or you can add layers to all the pictures you have open (or all the pictures in one folder) using Batch Processing.

    Creating Actions

    In the last post, I talked about adding Adjustment Layers. If there is a task that has several steps, such as this, that you do frequently to images, creating an action can make this easier. An action is a series of tasks that you can program Photoshop to remember, and run all of them automatically at the press of a button.

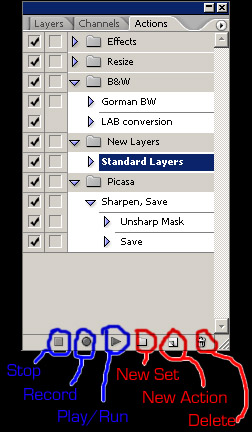
    To create an action, first open an image (any image) in Photoshop, then click Window > Actions. The window shown below will open.


    Note: if you want to add several tabs to this one window (as in the above image, where Layers, Channels and Actions are together), simply open each window (clicking Window > "desired window"), then with all windows open, simply drag the tab of one window into another window until they are all consolidated.


    Now, click the folder icon on the bottom of the Actions window (labeled "New Set") and name it "New Layers" (or whatever you want to call it). Then click on the turned up page icon (labelled "New Action") and name it "Standard Layers". This will begin the recording of the action automatically.

    You can stop and start the action recording at any time by pressing the Stop and Record buttons, respectively.

    I discuss the adding of layers in the previous post, Adding Layers. You can follow the steps in that post to create this particular action.

    Once you have completed all the necessary steps in the action, simply click the Stop button.

    Tada! You've just completed recording your first action in Photoshop!

    Running/Playing Actions

    Now the hard part is done. (Well, the composing, shooting, editing, publishing, etc. is the hard part, but you know what I'm getting at.) To run or "play" the action on a single image, have an image open and selected in Photoshop (you can have several images open for this scenario, but the action will only run on the image you have selected).

    Open the Actions tab, or click Window > Actions. Open the "New Layers" folder and click on "Standard Layers". Click the button labeled "Play". In just a few seconds, Photoshop will add all the layers to your photo, with all the blending modes, just as you specified. In one click!

    Now, to use the layers (as I will discuss in future posts), click on the Layers tab, or click Window > Layers to begin editing.

    Batch Processing

    Batch processing runs an Action on a group of images. You can specify the group two different ways: either all of the images currently open; or all of the images in a specified folder. I prefer to run actions just on open images, because I edit images 10-15 at a time, and a given folder (sorted by one-folder-per-day) can have hundreds of images.

    Batch processing requires that you have an action set up already, as I discuss earlier in this post.

    Note: The following instructions deal with running the above mentioned action specifically. If you create an action that requires the image to be saved as part of the action, then separate steps need to be taken.

    Note #2: These actions cannot be run on RAW files!

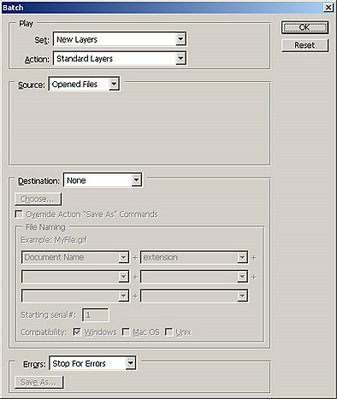
    Click File > Automate > Batch... and the following window will open:


    In the part of the window labeled Play, select Set > New Actions and Action > Standard Layers (or whatever you've called your actions set). Then in the part of the window labeled Source, select either Open Files or Folder, whichever has the images you wanted "Actioned" in.

    In the part of the window labeled Destination, select None, as you do not want anything else to happen to the images at this point.

    Now click OK and the action will run on all the images.

    Just as when you ran the action on one photo, you can go ahead and edit your photos with the layers you've added. Simply go to the Layers tab, or click Window > Layers.

    Loading Actions


    One great feature about actions is that you can save them and share them with others. Obviously, this means you can get saved actions from other people, too. One site with many great actions is Action Central. You can download actions from there and run them directly in Photoshop. Setting them up is straight forward.

    If you get an Action from the web, it is usually in a Zip file. First you'll need to unzip the file (with a program like Winzip or with WinXPs extractor).

    You can extract the action anywhere you like, but I would recommend making a folder in your Photoshop folder (C:\Program Files\Adobe\Adobe Photoshop CS2\) called "Actions".

    To load the action into Photoshop:
  • Open the Actions window (Window > Actions or Alt+F9).

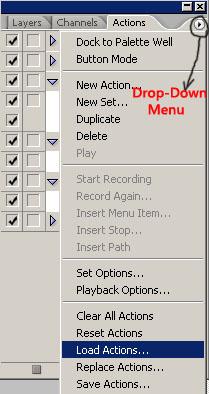
  • Click on the triangle-in-circle in the top-right corner.

  • Find the action wherever you saved it on the hard drive (not the Zip file, the action itself - it is a .atn file).

  • Then click on the file and click Load.


  • Now, if you want, you can rename the action by double-clicking on it and renaming it. Similarly, you can rename the folder (set) the action is in the same way. Or, if you want to put the action in another folder (set), you can click and drag it to where you want it in the Action window.

    You can also delete the action or folder by clicking and dragging it to the trash can in the lower-right corner of the Actions window.

    Saving Actions


    Finally, if you want to save an action (to either share with other people, or to back up somewhere in case your hard drive crashes), simply select the folder (set) of the action, click on the triangle-in-circle in the top-right corner of the Actions window and select "Save Actions...". You have to do it by entire set - not just one action at a time.

    More specific editing techniques will follow in the weeks and posts ahead. In the mean time, feel free to check out my website: http://www.picasaweb.google.com/mgreerphoto. If there is any image you want to know the editing procedure to, let me know at nikonmatt@gmail.com. I may be able to make that the topic of a future editing post.

    Thanks!

    Matt

    Standard Photoshop Adjustment Layers

    How to Add Standard Photoshop Adjustment Layers

    As promised in my last post, here is a guide of the adjustment layers I use most frequently when editing photos in Photoshop CS2. The following posts will describe the adjustment layers I use, what blending mode I use for each adjustment layer, and how to efficiently add these adjustment layers to your photos while editing - using actions and batch processing.

    Benefits of Editing with Adjustment Layers

    Most of the editing I do with adjustment layers can be done without layers - that is to say that edits such as Curves and Hue/Saturation can be applied directly to the main image layer itself.

    The benefit to using adjustment layers is that no edit is permanent until you flatten the image. You can even save the image with all of its adjustment layers as a Photoshop Document (.psd), and when you reopen it, all the changes you made to the adjustment layers will still be there for you to change back, remove, or alter.

    If you were to, for example, edit curves without layers, then go on to change saturation, crop the image, then add vignetting, the only way to go back and change what you did to the curves would be to go back in the history, to when you changed the curve (thus losing all work done since), or start the image editing from scratch.

    With adjustment layers, however, so long as that adjustment layer is still there, you can go back and alter the adjustment at any point in the editing process. It is a lossless editing process, and very handy. Sometimes one edit will affect the way another edit appears, so the first edit may need to be tweaked. This makes editing far more efficient and accurate!

    Most Common Adjustment Layers

    These are the adjustment layers that I use most often. I do sometimes use other layers, and often I don't use all of these. I tried to pare down the number of adjustment layers to something that would easily fit in the layers window, and still offer what I needed most. These are my selections, but YMMV. *Note: Blending Modes are shown in bold under each section.

  • Selective Colour (Canadian spelling - no 'u' in Photoshop)
  • Lighten/Darken specific colours
  • Add/Subtract sub-colour values (ex: decreasing the amount of cyan in the greens)
  • Mode: Normal
  • Hue/Saturation
  • Used for adjusting the hue and saturation of individual colours
  • Mode: Colour (prevents posterization of colours)
  • Curves
  • This curves layer used mostly for contrast and brightness adjustment. Colour balance can also be done with curves, but I prefer to add another curves layer for this.
  • I often use several curves adjustment layers as I find it easier than creating one very complicated curve. Multiple curves can be used in conjunction with each other, or applied to specific parts of images with masks (to be discussed in later posts).
  • Mode: Luminosity
  • Levels
  • Adjusts whitepoint and blackpoint (levels at which brightness values reach their extremes).
  • Sometimes used for brute-force brightness/contrast adjustment.
  • When holding Alt while moving the black or white sliders, preview will show which values have maxed out. Good way of checking to see if you've lost all detail on either end of brightness spectrum.
  • Mode: Luminosity
  • Soft Light Layer
  • Paintbrush strokes can be used as gentle marks, when used at low opacity.
  • Add vignetting with a large, soft, low-opacity paintbrush.
  • Lighten/Darken specific areas that would be too complicated to adjust with curves or other adjustments.
  • Add colour tint to specific areas, ie: whiten teeth, brighten eyes, add red to cheeks.
  • Mode: Soft Light
  • Adding Layers

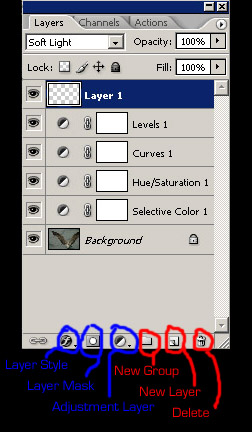
    First, you will need to have a photo open in Photoshop. Then, in the text command bar, click Window > Layers to bring up this:


    To add a new adjustment layer, click on the split circle labeled Adjustment Layer, then choose the layer you want to add. To change the blending mode, choose the mode from the drop down menu just under the layers tab itself (titled soft light in the image above).

    Note: There is one exception to this. To add the Soft Light Layer, you will need to click on the New Layer icon at the bottom of the Layers window. Be sure to change the Mode of this layer to Soft Light or any painting you do on that layer will be too harsh for general editing.

    Once more, for easy reference, here are the adjustment layers I use most, and the blending mode following them. They show up in reverse order (newest on top), so if this matters to you, be conscious of it if making an action out of this sequence:

    Layer Name Blend Mode
    Selective Colour Normal
    Hue/Saturation Colour
    Curves Luminosity
    Levels Luminosity
    New Layer Soft Light


    Finally, to save an image as a JPG or TIFF, you need to flatten the image. Otherwise, it will save as a Photoshop Document (.psd) and be very large (30+ Mb for an image from a 6MP camera). I do sometimes save images a .psd's if I want to go back in later to do work on individual layers, but when I'm done, I save them as .jpg files.

    So, to flatten the layers, simply click Layer > Flatten Image. Then save the image however and wherever you like! Please enjoy!

    Matt Greer
  •