In my last post, Actions and Batch Processing, I talked about how to add adjustment layers to a group of images using batch processing. In that tutorial, the images were neither saved nor outputted to a specific folder. I had a number of requests for instructions on how to batch process with Source > Folder and Destination > Folder. So, while this set of instructions is fairly wordy, it is meant as a sub-tutorial to my last one.
Let's start off with a bit of background. If there is a series of commands you apply to images on a regular basis, and you do it the same way every time, you can set up something called Actions. Some examples of this would be flattening layers in .psd images, changing the colour space, resizing them for web, and adding Unsharp Mask, or a black and white conversion method you like for portraits that has several steps. You can create actions for this that will run the commands on images automatically. Then, if you want to perform those commands on a specific group of images (either a group of images you have open, or all the images in one folder), you can do so with Batch Processing. That is what we will talk about now.
I am assuming now that you already have an action created. The first time you do this, it is a good idea to copy several images into a test folder so you can run through these steps without having to worry about doing something bad (and likely permanent!) to your original images.
With Photoshop CS (or CS2, which is what I based this tutorial off), click File > Automate > Batch. This window will appear:
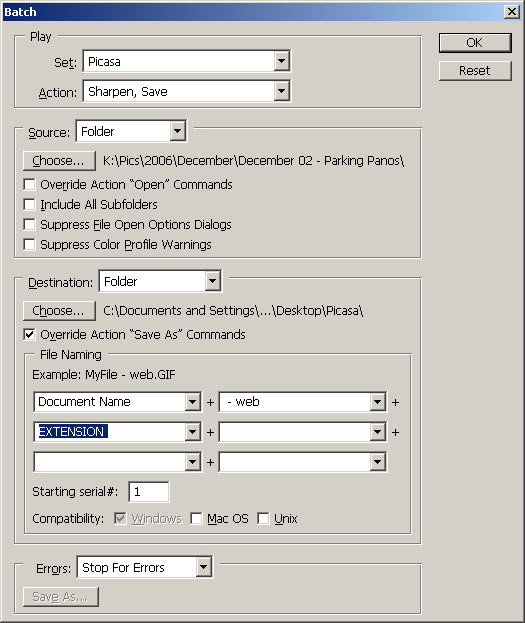
Play box: Choose the set and action that you want applied to the group of photos.
Source box: Choose either Opened Files (Note: This will apply the action to all images open in Photoshop) or Folder.
If Folder is chosen, be sure to select Override Actions "Open" Commands if 'Open' is part of your chosen action.
Decide whether you want to include subfolders or not.
Choosing Suppress File Open Options Dialogs will cause Photoshop to steamroll through this step. ie: the File > Open options window will not appear for you. You decide if you want to select this option. (Note: I don't have the Open command as part of any of my actions.)
Suppress Colour Profile Warnings may be a good one to leave unchecked as you could lose colour information (and thus image info), forcing the image from its native colour space into another.
Destination box:
None is what we covered in the Actions and Batch Processing tutorial. Use this if your action does not have Close as the final step, and if you want to keep working on the images after the action has run. (Note: for actions that require further work after the action is applied, I like to omit the Save command. This is just my preference.
Save and Close will save the images back where they came from and overwrite the originals. I prefer to keep my originals as is. (Note: if you have created layers, or your action adds layers, make sure to add Layers > Flatten Image as part of the action, or saving as a .jpg or .tif will not work.)
Folder is my preference. You can choose the same original folder, but with the steps below change its file name easily! Now, choose your output folder. I recommend changing the folder if the images are batch processed for a one-time use (ex: uploading to a website, then deleted from hard drive) or if you do not rename the images somehow. I always prefer to rename a newly saved image no matter where I put it (ex:img-sharpened.jpg, img-web.jpg, img-b&w.jpg, etc.). If part of your action is to Save, then be sure to check Override Action "Save As" Commands or every picture will be given the same name as the file you saved when you first created the action. This "feature" is just one more reason not to save the new files in the same place as the originals. If you just did work on 30-odd images and were batch processing the same action on all of them as the last step, they could be lost as they'd all be saved to the same file name, and thus overwritten.
File Naming sub-box: You have some flexibility here, but for the sake of file management, here's what I do: keep the original name (titled Document Name) in the first drop-down menu, then in the second drop-down menu, add a space-hyphen-space then a word/phrase (ex: - web, or - sharpen). I like to keep out-of-camera file names attached so I can more easily find the originals later.
You can keep adding more options in the drop-down menus. And you don't need to keep the original file name, either. You could have 'Sunday Brunch' (just an example) as the beginning of the file name (and thus the common denominator in all the images about to be batch processed), then use a serial (1, 2, 3, 4 Digit Serial Number or Serial Letter) from the drop-down menu to consecutively number all the images. To completely rename the images, just type whatever name you want used in the first drop-down menu.
You can even add the date to the image, though if you do, I would definitely recommend adding a serial to it iff you had the whole series completely renamed (ie: if they all say "SundayBrunch061106", you'll need something to follow to differentiate them. Again, this is why I keep the "DSC_####" as the prefix on all my edited pics.)
Finally, choose Extension as the option in the last drop-down menu. This will automatically put the file extension on each image. (Don't worry that the example given says ".gif" - it will not make them gifs unless you tell it to. Saving a jpg will keep it a jpg.)
The Starting Serial tick-box only comes into play if you select Serial Number or Serial Letter from the drop-down menus. You can have your images start numbering from wherever you like.
Compatibility: I use a PC (with WinXP) so 'Windows' is selected by default for me. Checking the others makes sure the file names will be recognized on the other respective systems. I don't check the others, and have never had a problem. My primary concern is having my images work on my system, and follow the file-naming scheme I create for them.
Errors box: I prefer it to Stop for Errors, such as trying to save a jpg that has layers (can't be done!), because sometimes I rush and make a mistake. This will not catch all your errors (such as overwriting the same file, over and over again - remember Override Action "Save As" Commands from earlier?), but still helps. It hasn't caused me any problems (other than occasional self-doubt!).
When finished, click OK, and you're finished!
I do hope this was some help. If I was unclear or mistaken at any point, or if you want more information added, please Email me.
Thanks.
Matt
17 comments:
How do I stop photoshop from prompting me for image quality when save action takes place?
Hi Scott.
When you first record your action, Photoshop will ask what quality level you want to save the image as. Make sure you make this part of your action (in other words, when you create the action, "save" the image before you stop recording the action).
Then, when you go to run the action, it'll happen automatically. If you 'Batch Process', select the 'Override Action "Save As" Command' box.
Hope this helps.
Matt
Hi Matt,
Thanks for the helpful response. I think the reason I've been struggling with this so much is that I need to do something Photoshop just doesn't seem to want to do... I have a directory with multiple subdirectories. I want to process all the files and simply save and close, OVERWRITING the originals. It seems that PS cannot do this? Since it wants you to explicitly define a destination for your "Save As..." command, the subdirectory structure would be lost. Alternately, if I DON'T include the Save As.. step as part of my Action, I'm left with the built-in "Save and Close" option, which causes PS to prompt for the quality setting for each file. BUMMER. If you know a way around this problem, please let me know.
Thanks again for a great resource.
-Scott
although this is an unrelated question is there a way to have action to save as to a folder ?
Imagining that I have to deal with many files at the same time, how do I specify the filename ?
E.g
I open img1.jpg, img2.jpg and now I run this action on them, one by one, and at the end I want to save the processed file into a certain folder and have it renamed as pp-img1.jpg, pp-img2.jpg
Q-Master - you certainly can. When you set the file name in the batch window, put whatever you want in the first box (in this case 'pp-'), then select 'Document Name' from the next dropdown and so on. Then you can also tell it what folder to export to.
Hope this helps.
Matt
Matt,
Like Scott asked,
How do I stop photoshop from prompting me for image quality when save action takes place? (during a batch process). I assume this is a random error as it sometimes asks me and sometimes not.
But I don't want to include a save as step in my actions, as I use them on single occasions and not save straight away.
Hi Chris -
I think you may need to create two separate actions to do this. The non-save action, you'd just output to 'none', as opposed to a folder.
The other option is to go to the 'Actions' window, expand the action you've created (with the 'save' option in it), remove the check mark from the 'save' step, then run the batch process.
Just remember to add the check-box again for the next time you run the action.
You can do the same thing if you're doing one image, but instead of batch processing, you can press 'play' at the bottom of the actions window and run the action on just one image.
Hope this helps.
Matt
i kept going crazy - ps kept saving as 1st files name.
here is what i was doing wrong:
When recording actions DONT record the action of opening the file.
start the actions from a file that is allready opened.
when you do file - automate - choose folder as source, and check box supress file open dialogs - that takes care of opening all files in the folder.
When I'm recording an action, one of the things I do is save for web to a folder "Thumbnails." Now when I run the batch file, even though I set the destination folder to something else, it ignores it and tries to save it to Thumbnails. How can I fix this problem?
Thank you for the help.
Not sure exactly what steps you're taking, but make sure you're clicking the 'Override Action "Save As" Command' box. If you're specifying a different output folder (not to be confused with the source folder), then it should be going wherever you tell it to go. Let me know if this helps.
Hello,
I have a batch process problem I can't solve. I'm using a Mac and Photoshop CS3.
I'm trying to batch process an action that includes "Save for web & devices...".
I have the "Override Action 'Save As' command" checked.
When the batch is saved, it saves them to the desk top, not the chosen destination folder.
I noticed that when I choose "save as" the action records it as a "save". When I choose "save for web" the action records it as an export.
Can "save for web" be batch processed, and is "export" the problem here?
Thank you,
Steve
Wow Steve - I think you may have me stumped.
To be honest, I don't use the 'save for web' function. I resize my images, sharpen them accordingly, and save them at the lowest setting possible (when posting to web). I do often create actions to do this for me, but I haven't ventured into the 'save for web' function.
If 'save for web' is showing as 'export', then maybe the batch processing can't override that step.
If you still have problems not using 'save for web', let me know. I'm not using a Mac or CS3, but it should all fall in place.
Good luck!
Hi Matt,
Thanks for the quick response. It works fine when I use "save as" setting. The "save for web" mode really seems to get the files small, and they still look good.
If I "save as" a JPG at 72 dpi, 250 px X 188 px,at the lowest setting the file size will be about 100 kb.
When I "save for web" at the same numbers, and set the quality at about 50% the file size will be less than 20 kb.
I don't know why there's such a difference between the two.
i tried to call Adobe today, but after holding for 15 minutes I hung up.
Thanks again,
Steve
Still 100k at the size, huh? That is pretty big.
I resize my images to 800px on the long edge for flickr (I'm starting to grow fond of it, but haven't divorced picasa yet - a marriage of the two would be ideal!), and on fairly high quality (9 or 10 out of 12), they are usually around 170k (and that's fully sharpened for the size, too). I also resize for facebook (jeez, that site has wretched photo hosting) to (I think) 504px on the long edge, sharpen, and save at 7 out of 12. They get down under 100k, and that's still quite a bit bigger than your images.
I think that 'save for web' is probably around the 7 out of 12 (or lower) save quality, and if you play around with that, you may be able to get what's right for you.
If you have a save quality set in in action, the quality will remain in the batch processing, even if you 'override save-as'.
Note that you can only set the quality when you actually build the action - not when the batch is running.
Let me know how it works!
Hi there Matt...your excellent info saved me a ton of robotic work and time at work..
I'm trying to perfect now my "actions" but the batch processor keeps closing the images.
The thing I need to do is create 5 diferent sizes of each image, save each with the original name + and extention denoting its size.
Any ideas to make it in a single action? I already did figure out how to do it in multiple actions but it would be cool to have it with just one click.
Hi Anonymous.
I'm not sure what to suggest for getting multiple images saved from one action. I'm not on a computer with PS right now, so I cannot look, but I believe there are more involved ways of doing batch processing where you can save multiple files (though I have a feeling you have a maximum of three files). I'll have a look this evening and see what I can find for you.
Hi,
I'm not sure if anybody has solved the destination folder problem when using a "Save for Web" action in batch processing with Photoshop.
Here is how I've done it (in cs3).
Sorry if I'm repeating some info, just think its best to include everything.
If you want to include a "save for web" action in batch processing, first you must record the "save for web" as an action.
When running that action within the batch processing you have to make sure the "Override Action "Save As" command" box is ticked
- This overrides the action set by the "Destination:" drop down box above. Anything you have selected there will not occurr.
"Save for Web" is not classed as a normal "Save As", it is an Export. So anything set within the action applies - Including the destination folder.
I set up a dedicated folder called "resize" or "web" and set this folder as the destination when recording the "save for web" action.
When completed I just moved the entire contents of the "resize" or "web" folder to wherever I needed the images. Then that folder is free for the next batch of images.
Hope somebody finds this useful.
Cheers,
Paul.
Post a Comment