In today's tutorial, we will cover how to correct image distorion. Photoshop CS2 has some excellent, powerful tools to help with these problems, and I will cover them in detail. We will learn how to straighten the horizon, correct Pincushion and Barrel distortion, a couple of ways to modify perspective (correcting the illusion of buildings leaning back from shooting up at them), and finally, removing Vignetting.
These tools, once learned, are quite easy to use. While they aren't as prominently featured in Photoshop as other features like Levels, Contrast, and Saturation, they can be just as essential in creating amazing images. Let's begin!
Straightening the Horizon
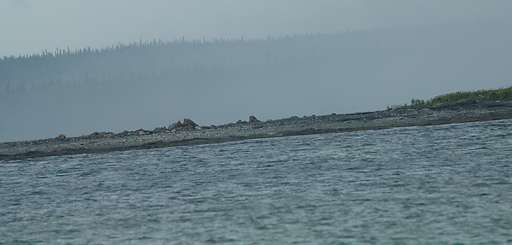
The horizon in this shot is obviously not level. The best solution to this would be to reshoot the image, this time with the horizon straight (some tripods come with levels; you can get bubble levels that fit on the hotshoe of cameras; and many Nikon cameras have on-demand grid lines in the viewfinder that help with achieving a level horizon).
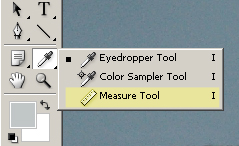
Short of that, however, there's an easy fix in Photoshop. With the image open, select the Measure Tool from the Tools Pallet (Window > Tools), shown below. It is hidden under the eyedropper tool. You can also access the Measure Tool by pressing Shift + I repeatedly, cycling through the tools under that keyboard shortcut until the Measure tool is selected.
Now, with the Measure Tool selected, click one point on the horizon, then drag the line across to another point on the horizon - a line that should normally be perfectly horizontal.
For fine tuning, you may find it easier to zoom in on the image (Ctrl + Space + Left-Click - zooming out is Alt + Space + Left-Click).
If you made a mistake with your line, simply click Clear in the Options window at the top of the screen.
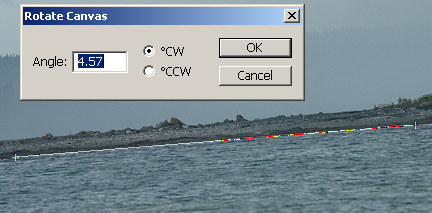
Now that the line is drawn, click Image > Rotate Canvas > Arbitrary, and the correct value for straightening the horizon will already be calculated. Simply click OK, and the image will be rotated.
Now, you will notice that the corners of your image need to be cropped off because of the empty white spaces left by from the rotating. Simply select the crop tool (C), select the area you want to keep, and either press Enter or click the check-mark in the Options window.
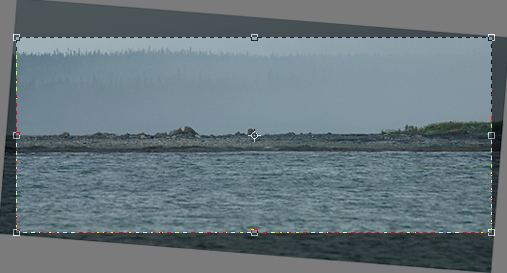
As you can see, you lose a considerable amount of your image by doing this, which is why it is important to always pay attention to your horizon while you're shooting. Still, it is better to lose a little bit of your image than to not be able to use the image at all because it is crooked.
Correcting Pincushion and Barrel Distortion
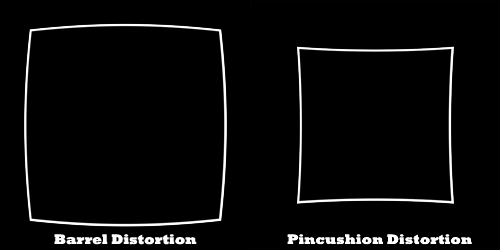
Many lenses today have some level of distortion (see Photozone's lens reviews for more information), especially super-zooms. Much of the time, the distortion isn't noticeable. When you really see distortion is when there is a straight line running near one of the edges and it is bowing inward (pincushion) or outward (barrel). Much like using the Measure Tool mentioned above, correcting this type of distortion is usually fairly simple.
Note: if you have multiple Layers, be sure you have either flattened the image, or have the image layer selected. This tool does not alter the entire canvas - just the selected layer.
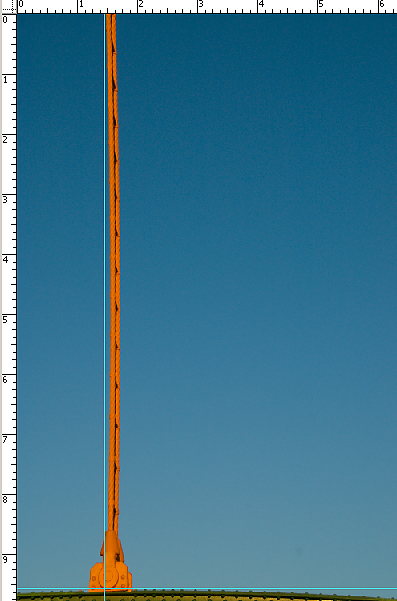
As you can see, the above image has some obvious pincushion distortion. (The blue lines were added as guides with the ruler tool (Ctrl + R) for reference.)
While this sort of distortion is fairly obtrusive, it is quite easy to fix. While in Photoshop, click Filter > Distort > Lens Correction and you will see the following window.

There are a few points to make note of in this window:
Make sure the Remove Distortion Tool (D while in this window) is selected from the upper left-hand corner of the window.
If you need to move the grid around, click the hand just below (or press M), then go back to the Remove Distortion Tool.
Change the grid size with the Grid Size slider on the bottom of the window.
Clicking the Preview button on and off helps give you an idea of the changes being made to the image
To actually remove the distortion:
Slide the Remove Distortion slider (top-right of window) Left to remove Barrel Distortion.
Slide the Remove Distortion slider Right to remove Pincushion Distortion.
If you are removing Barrel Distortion (and thus pulling the sides of the image inward), then you will have blank areas around the border of your image. You will then need to crop (C) those parts of the image off. Some corner information will thus be lost, but, depending on the image, better to lose the corners than the whole image because of unacceptable distortion.
Remember the above Lens Correction window, as we will use it again in this tutorial, for Removing Vignetting.
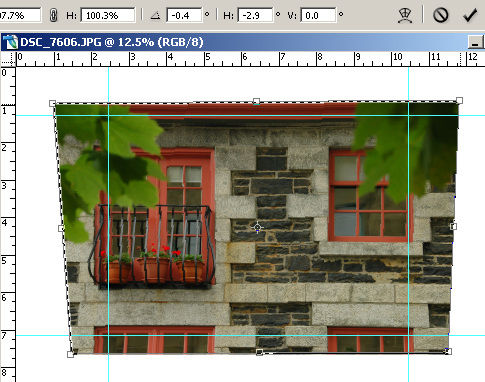
Modifying Perspective
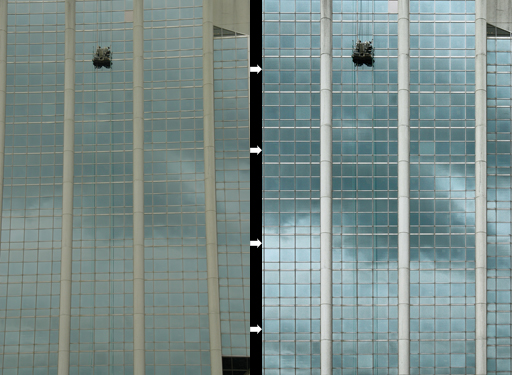
As you can see in the first image above, the building looked to be leaning away from you. This kind of distortion is known as Perspective. The second image has it corrected (along with a Curves adjustment). This adjustment is done quite easily with the Crop tool (C).
With the Crop tool (C) selected, select the entire area of the image.
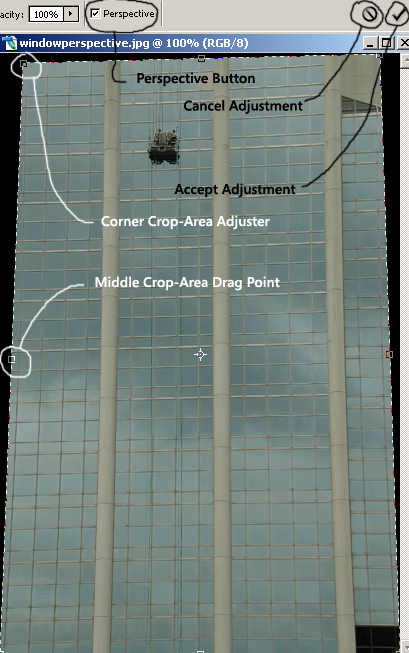
Click the Perspective button in the Options window, at the top of the screen.
With the image selected, click and drag the top-left crop-area corner so the left vertical line is parallel with a left line of the building. If you need to move the entire line in to make sure it lines up perfectly, do so with the middle crop-area drag point (half way between top and bottom of selection), make the adjustment, then drag the line back out.
Do the same adjustment with the right side.
Make sure the top and bottom crop-area lines line up the way they should. If you were not shooting the building (or whatever) straight on, then adjusting (lining up) these lines, can correct that perspective too, if you want it to. Just be conscious of the positions of these lines.
When finished lining everything up, click the check-mark (Accept Adjustment) button in the Options windows.
If the results aren't perfect, simply undo your actions (Ctrl + Z) and attempt it again.
Alternate Perspective Modification Method
Before we leave Perspective Modification, there is another way to do it. I prefer the above because it is quick and easy, and leaves you with an image ready for editing. Quickly, though, here's another way to do it.
Open the image that needs the perspective corrected on it
Make the canvas larger (Image > Canvas Size or Alt+Ctrl+C) by 30% in each direction (130% total, after choosing 'Percent' from the drop down menu), or more if radical changes are needed.
Add the ruler bar (Ctrl+R), and add a couple of horizontal and vertical reference lines by left-clicking in the ruler area around the edge of the image, and dragging in the reference lines.
With the rectangular marquee tool (M), select the image only.
Click Edit > Transform > Skew.
Now, just as with adjusting the corner control points with the crop tool, move these control points around the line up the vertical and horizontal lines in the image with the ruler reference lines. With this form of adjusting perspective, the image with adjust as you move the control points.
You can only adjust either the horizontal or vertical at a given time with this tool - to change the other, simply release the left mouse button and reclick to drag and adjust.
When completed, click on the check-mark (Accept Image Adjustments) button in the Options bar at the top of the screen.
You will now be left with a large, empty border around your image which you will need to crop (C) off.
Now, finally, to vignetting!
Correcting Vignetting
Vignetting (sometimes called light fall-off) is the darkened corners of images. So long as the vignetting is simply light fall-off caused by the mechanical properties of the lens (and not something actually blocking the light, such as too many filters or a misaligned lens hood, which could cause complete loss of detail in the corners), the image can be easily corrected. One easy way is with the Lens Correction tool used in the Pincushion and Barrel distortion correction section.
You can see the before and after results of removing vignetting above. The steps are quick and easy:
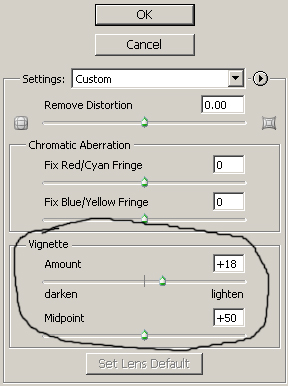
With the image open in Photoshop, click Filter > Distort > Lens Correction.
First, turn off the grid lines (check-box at the bottom of the window).
Note the two vignette sliders (Amount & Midpoint) on the right-hand side of the window. Slide the Amount slider to the right to lighten the corners.
I find for most images, keeping the Midpoint in the middle (at +50) works best.
At this stage, lightening is done by eyeballing. Be careful not to overdo it, as it will result in obviously light corners.
Click the preview button (bottom of the window) on and off as you go to see the results.
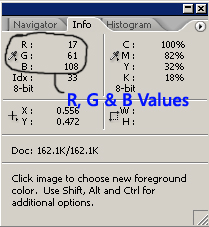
As a final check, you can check your brightness values with the Info window (F8). Assuming your image is supposed to have the same tonal values from the centre to the corners (you probably wouldn't notice vignetting otherwise), move the mouse over the image from center towards the corrected corners. The R, G & B values in the Info window should not increase as you approach the corners.
Note:I usually try to leave the corners still slightly darker - this makes sure I don't over do it, and it keeps the viewer's eyes from leaving the image.
Alternate Vignetting Removal Method
There is one other way to remove Vignetting, though it is less precise. I sometimes remove (or add, if need be) vignetting with a Soft Light Layer. Here's how to do it:
With the image open in Photoshop, open the Layers window (F7) and click the Create New Layer button in the bottom of the window (or press Shift+Ctrl+N).
In the drop-down menu in the Layers window (the Blend mode), select Soft Light.
Select the Brush tool (B), change the paint colour to white (D gives the default brush colours, X alternates between the Foreground and Background colour).
Make the brush large ([ makes the brush smaller, ] makes the brush larger), at least 1000px, and soften the edge (Shift+[ makes it softer, Shift+] makes it harder).
Turn down the opacity to 10-15% (pressing 1 will make it 10%, pressing 1+5 makes it 15% - you can figure out the rest), and paint the corners of the image lighter.
And that's it. You've just removed most of the common distortions from your image!
If you have any questions, comments, or suggestions about this tutorial, please Email me.
I'll be back with more soon.
Thanks.
Matt
6 comments:
Mr. Greer, came across your site in a Google search on correctiong images. Thanks for providing your instructions on correcting perspective with Photoshop. This kind of instruction is sorely missing in Photoshop. Much appreciated.
Thanks for the article. I appreciate the tutorial.
Bernie
I must admit that you have profound knowledge in photography. So much technicalities I have come across about image distortion. Great to have known to these techniques.
Thank you! This was exactly the information I needed. I shall be back!
Hello,
I will leave a comment here, but it relates to your entire blog, as well as your photography site - THANK YOU! Your efforts are not only greatly appreciated, but are unparalleled anywhere on the web! Not even the books come close - I have several, and was never able to get as much our of their hundreds of pages as from your tutorials.
Thank you, a great, BIG thank you!
Thanks for sharing this information and beautiful picture.. They are really stunning... You did a great job.
Post a Comment