How to Add Standard Photoshop Adjustment Layers
Benefits of Editing with Adjustment Layers
The benefit to using adjustment layers is that no edit is permanent until you flatten the image. You can even save the image with all of its adjustment layers as a Photoshop Document (.psd), and when you reopen it, all the changes you made to the adjustment layers will still be there for you to change back, remove, or alter.
If you were to, for example, edit curves without layers, then go on to change saturation, crop the image, then add vignetting, the only way to go back and change what you did to the curves would be to go back in the history, to when you changed the curve (thus losing all work done since), or start the image editing from scratch.
With adjustment layers, however, so long as that adjustment layer is still there, you can go back and alter the adjustment at any point in the editing process. It is a lossless editing process, and very handy. Sometimes one edit will affect the way another edit appears, so the first edit may need to be tweaked. This makes editing far more efficient and accurate!
Most Common Adjustment Layers
Lighten/Darken specific colours Add/Subtract sub-colour values (ex: decreasing the amount of cyan in the greens) Mode: Normal
Used for adjusting the hue and saturation of individual colours Mode: Colour (prevents posterization of colours)
This curves layer used mostly for contrast and brightness adjustment. Colour balance can also be done with curves, but I prefer to add another curves layer for this. I often use several curves adjustment layers as I find it easier than creating one very complicated curve. Multiple curves can be used in conjunction with each other, or applied to specific parts of images with masks (to be discussed in later posts). Mode: Luminosity
Adjusts whitepoint and blackpoint (levels at which brightness values reach their extremes). Sometimes used for brute-force brightness/contrast adjustment. When holding Alt while moving the black or white sliders, preview will show which values have maxed out. Good way of checking to see if you've lost all detail on either end of brightness spectrum. Mode: Luminosity
Paintbrush strokes can be used as gentle marks, when used at low opacity. Add vignetting with a large, soft, low-opacity paintbrush. Lighten/Darken specific areas that would be too complicated to adjust with curves or other adjustments. Add colour tint to specific areas, ie: whiten teeth, brighten eyes, add red to cheeks. Mode: Soft Light
Adding Layers
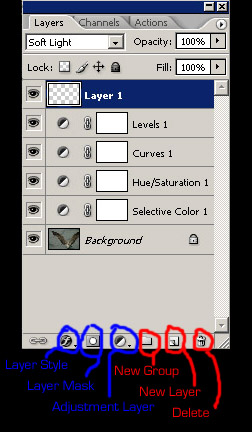
To add a new adjustment layer, click on the split circle labeled Adjustment Layer, then choose the layer you want to add. To change the blending mode, choose the mode from the drop down menu just under the layers tab itself (titled soft light in the image above).
Note: There is one exception to this. To add the Soft Light Layer, you will need to click on the New Layer icon at the bottom of the Layers window. Be sure to change the Mode of this layer to Soft Light or any painting you do on that layer will be too harsh for general editing.
Once more, for easy reference, here are the adjustment layers I use most, and the blending mode following them. They show up in reverse order (newest on top), so if this matters to you, be conscious of it if making an action out of this sequence:
| Layer Name | Blend Mode |
| Selective Colour | Normal |
| Hue/Saturation | Colour |
| Curves | Luminosity |
| Levels | Luminosity |
| New Layer | Soft Light |
Finally, to save an image as a JPG or TIFF, you need to flatten the image. Otherwise, it will save as a Photoshop Document (.psd) and be very large (30+ Mb for an image from a 6MP camera). I do sometimes save images a .psd's if I want to go back in later to do work on individual layers, but when I'm done, I save them as .jpg files.
So, to flatten the layers, simply click Layer > Flatten Image. Then save the image however and wherever you like! Please enjoy!
Matt Greer
4 comments:
thank you so much this is going to help out a hole lote
Patti
Thanks for sharing this information. Much appreciated. Thank you for also spelling colour properly.
Matt,
On behalf of all photographers in the world: "thank you"
Your site is wonderful and the material you are covering are very important to all of us editors.
Farzad
Thanks for the great tutorial. Now my question would be how to apply an adjustment layer permanently to several layers an image sequence of 80 frames (as layers) so that I can then import them it into another software with the effect.
Thanks,
Miguel
Post a Comment